Automation Rules in Odoo 19 CRM
Sales teams often perform the same tasks whenever an opportunity reaches an important stage in the CRM pipeline. They may need to send an email, notify another team member, add a follower, or schedule a follow-up activity.
In Odoo 19 CRM, Automation Rules can handle these repetitive tasks automatically when predefined conditions are met. This helps sales teams maintain consistent workflows while reducing manual work.
In this guide, we'll create an automation rule that runs when an opportunity moves to the Qualified stage. The rule will automatically:
- Send an email
- Add a designated follower
- Create a follow-up activity
How to Create an Automation Rule in Odoo 19 CRM
First, open the CRM module in Odoo 19 and navigate to the CRM pipeline.
You can configure the automation rules for each stage of the pipeline. Open the configuration menu using the gear icon and select Automations.
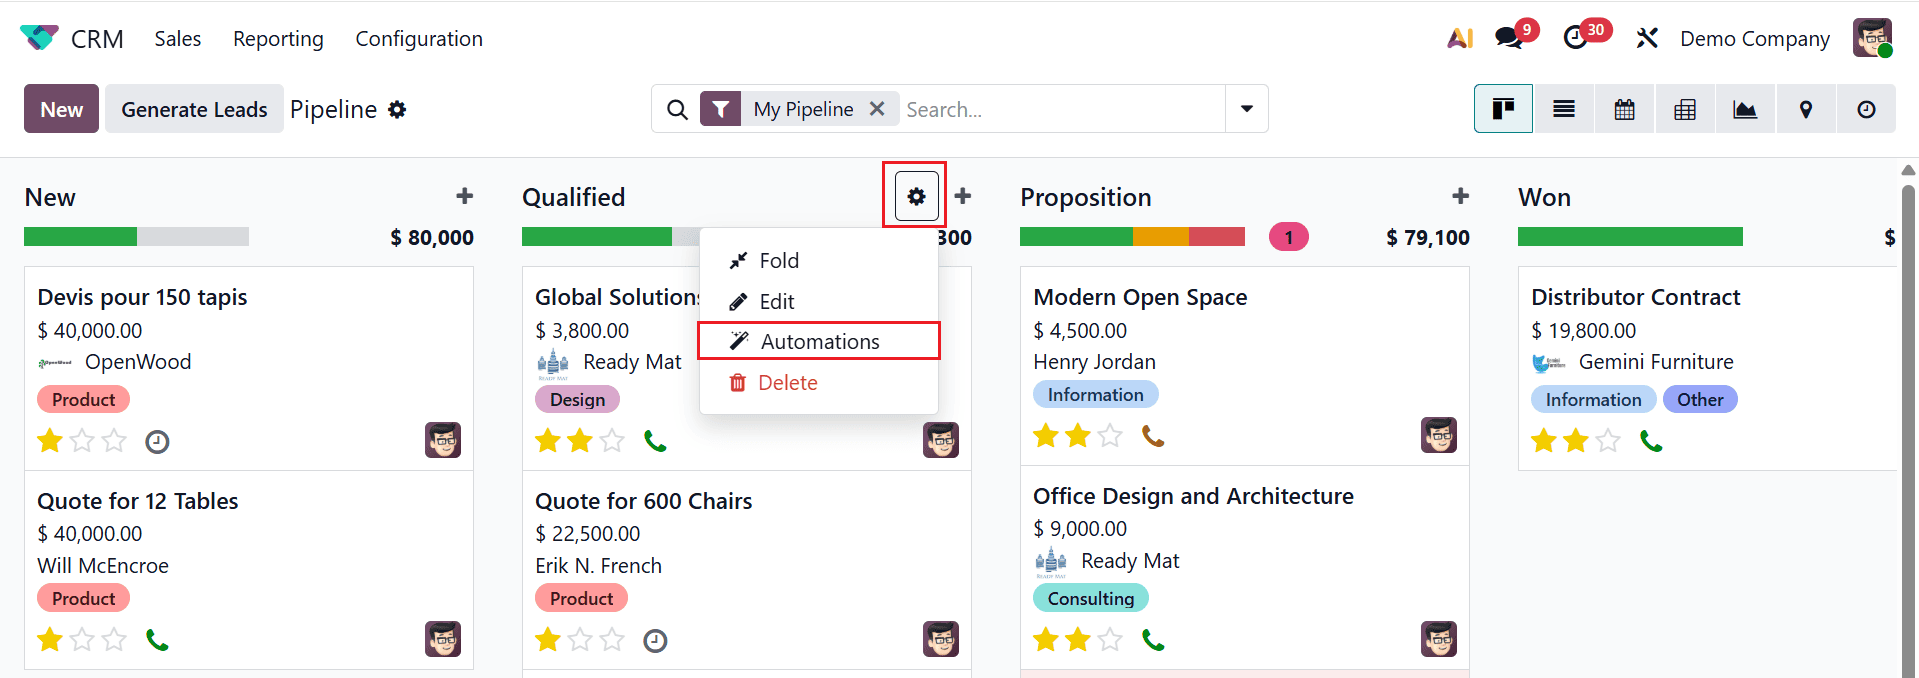
A new window will appear where you can add one or more predefined actions in response to a specific trigger.
Click New to create an automation rule.
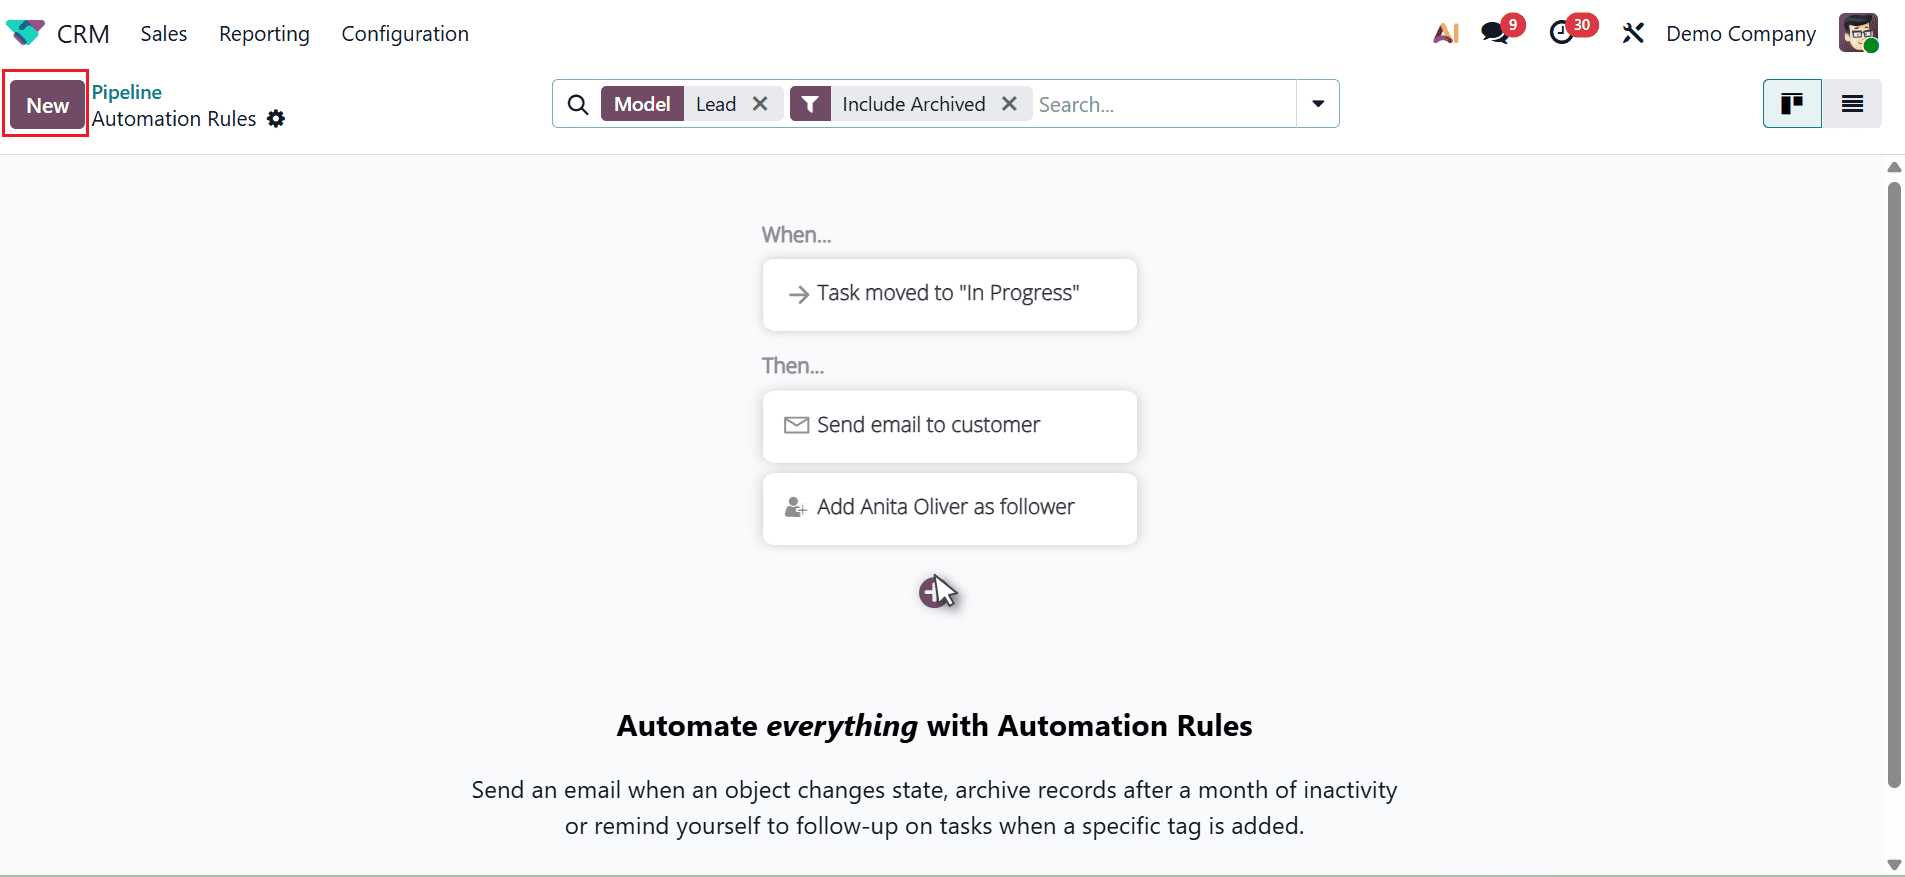
1. Configure the Automation Rule
Start by providing the basic information for the rule.
Rule Name
Firstly, add an appropriate name for the rule that defines its purpose.
Model
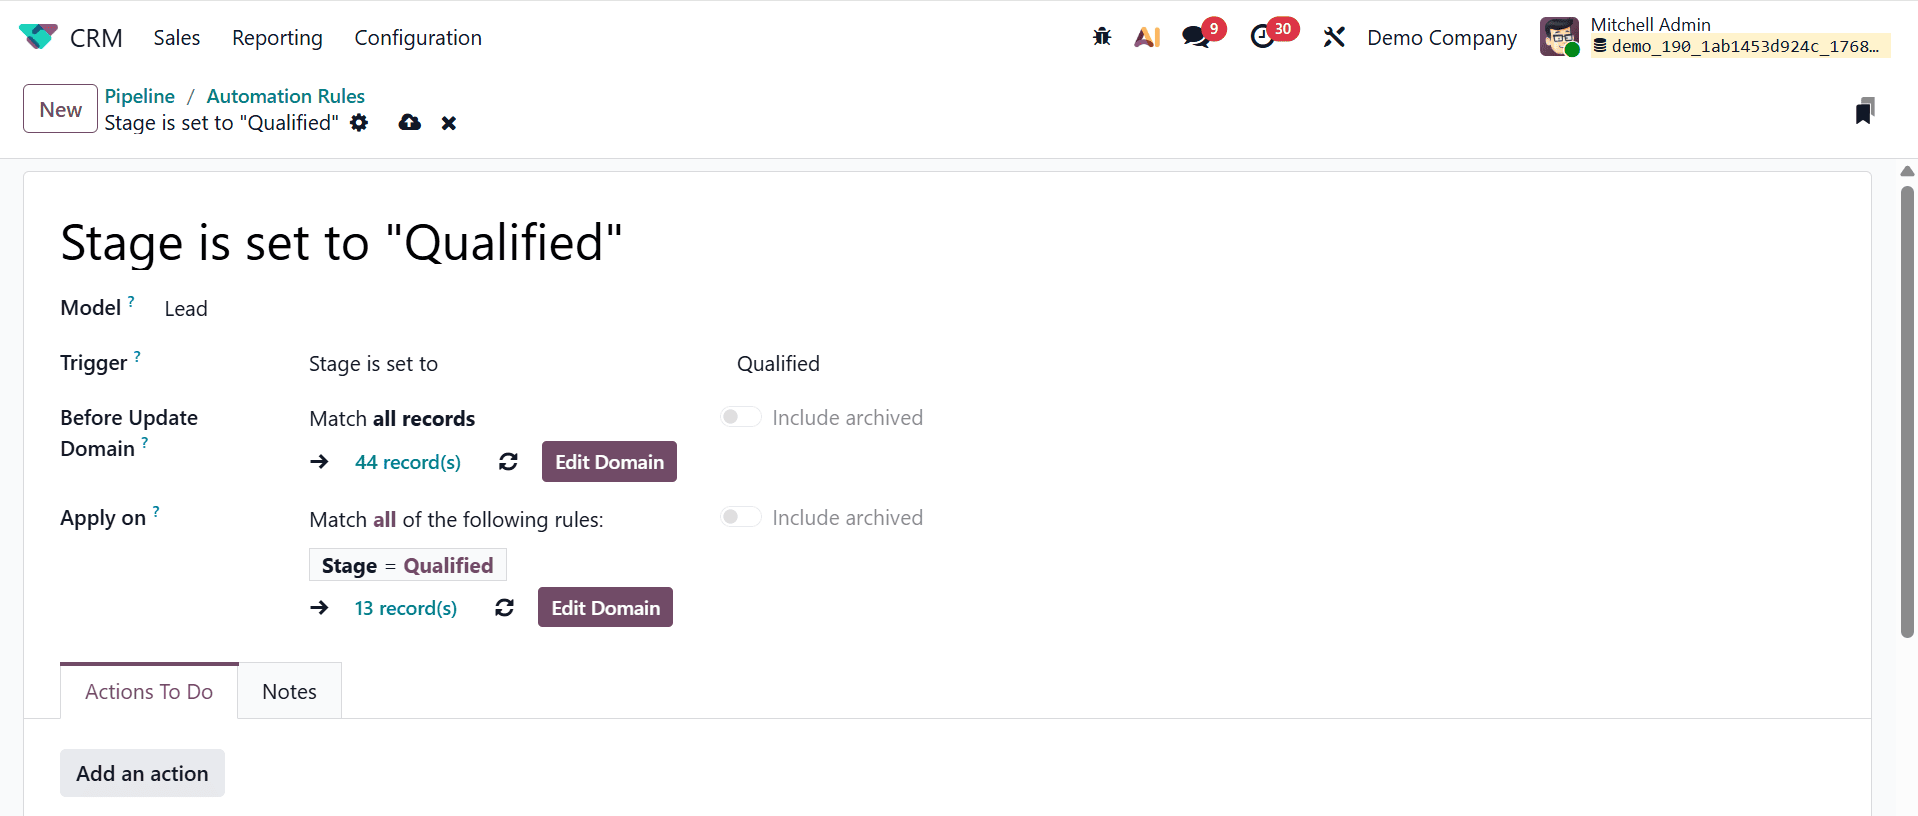
Select the model to which the automation rule applies. For this example, the rule is configured for CRM lead, where any change made to lead records can trigger this rule.
Trigger
Select the event that should activate the automation. In this example, the automation is triggered when the opportunity reaches the Qualified stage.
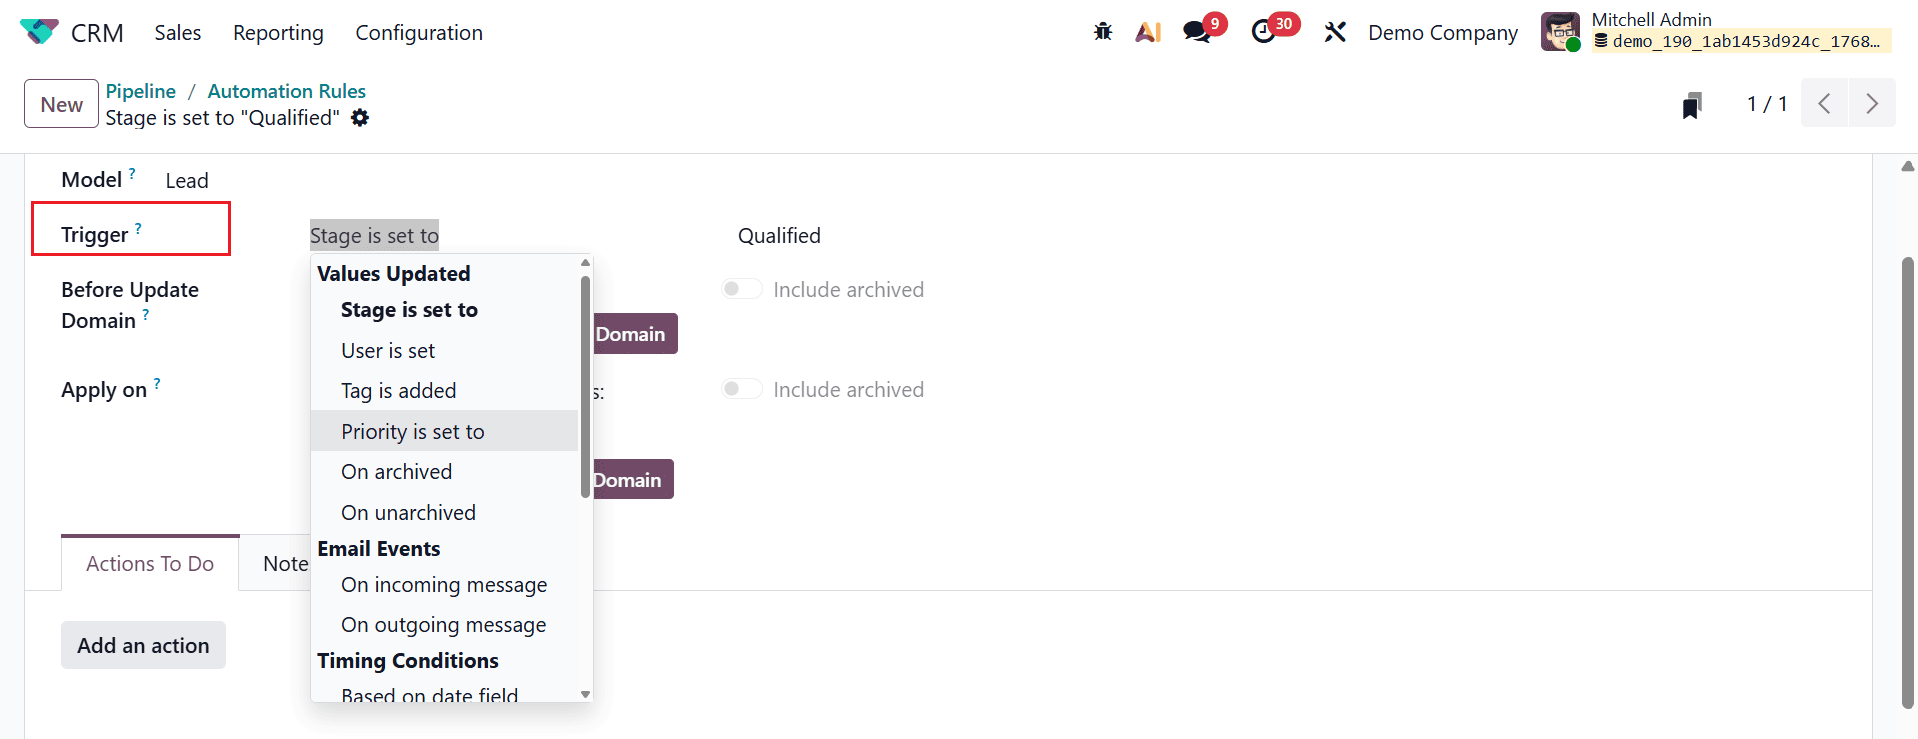
You can also use conditions to control which records trigger the automation.
Before Update Domain
This option allows you to define conditions that must be met before the record is updated. This can help prevent the automation from running on records that do not meet the required criteria.
Apply on
Define which records the action will run on after the trigger. It checks the updated values of the record. For this example, the automation applies when the opportunity's stage is Qualified.
These conditions ensure that the automation runs only when the intended CRM workflow occurs.
2. Add Automated Actions
Once the trigger and conditions have been configured, define what Odoo should do when the rule runs.
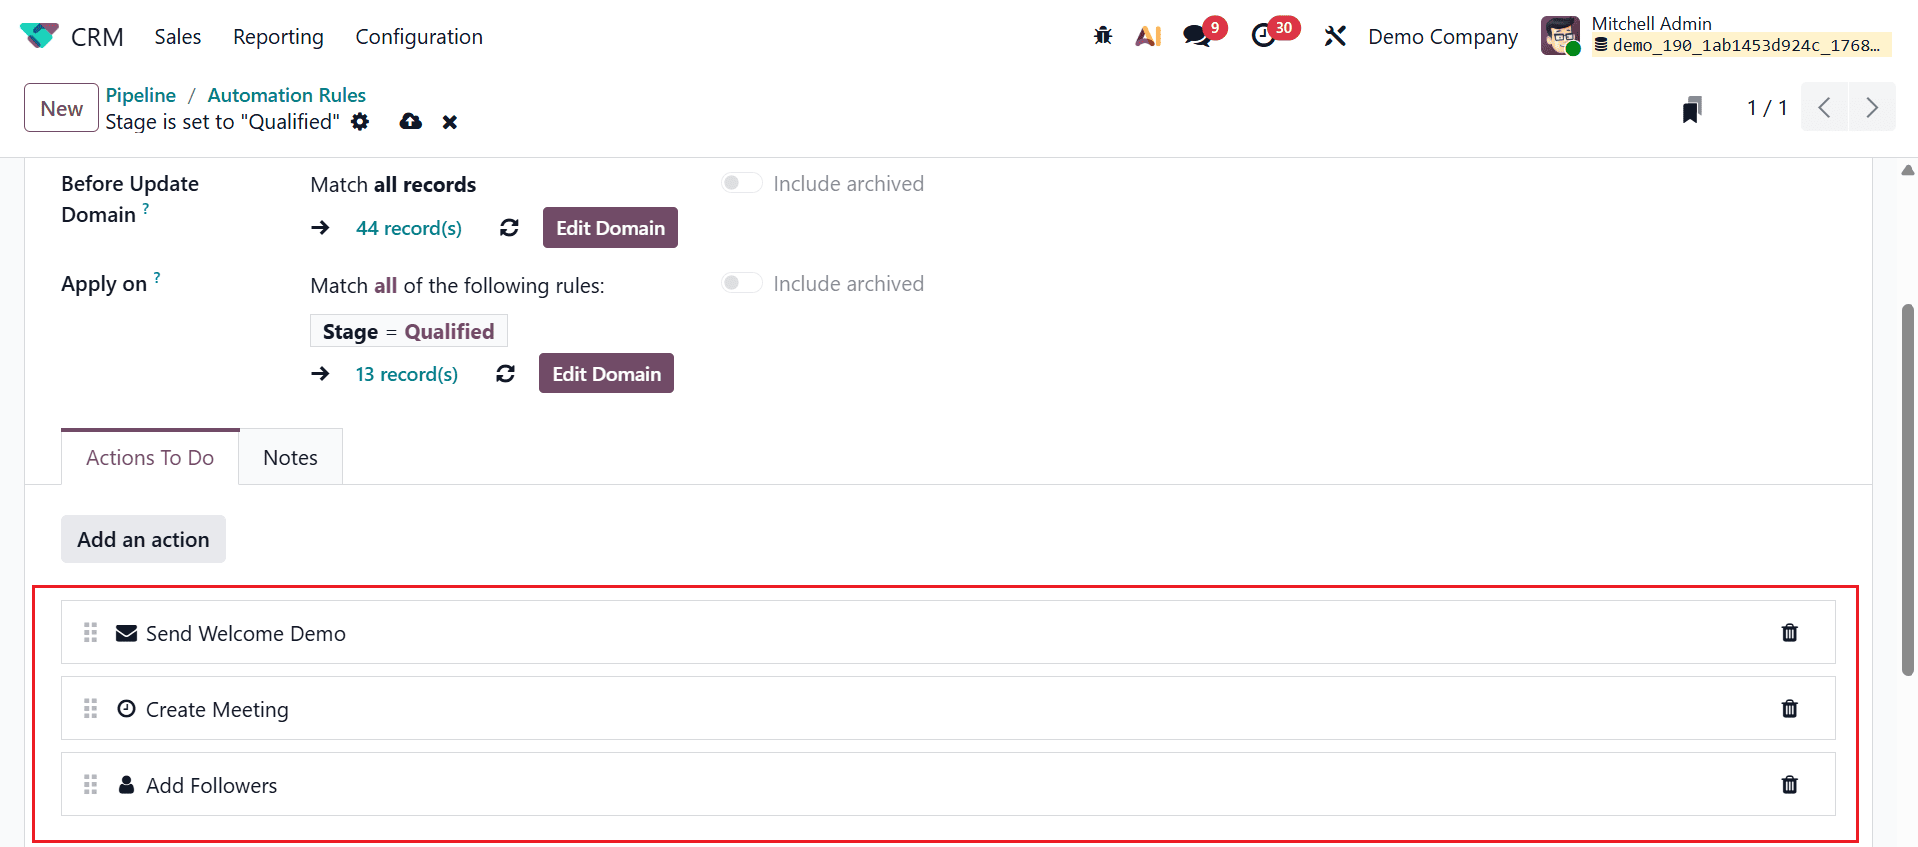
Actions To Do
Under Actions To Do, you can define the automatic action when the rule is triggered. These actions run immediately after the conditions are met. Click on the Add an action button to add actions to the rule, as shown below:
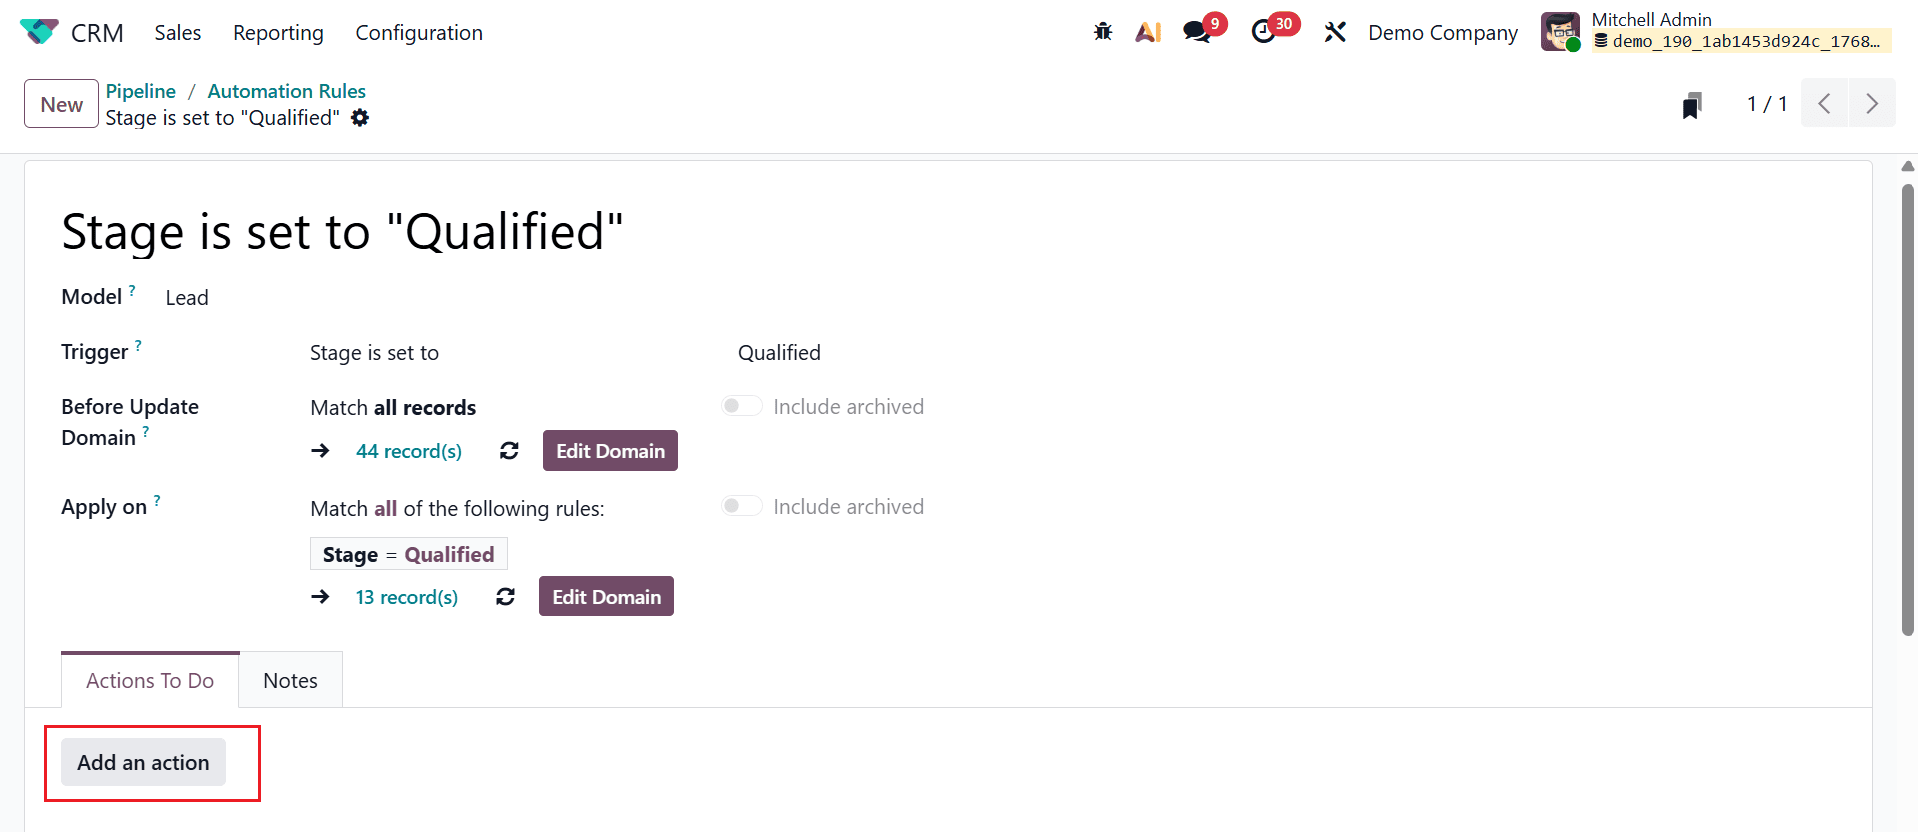
A new pop-up window will appear, allowing you to define the action to be performed when the trigger condition is met.
Odoo 19 provides several types of automated actions, including:
- Update Record
- Create Record
- Duplicate Record
- Create Activity
- Send Email
- Send SMS
- Add Followers
- Remove Followers
- Execute Code
- Send Webhook Notification
- Multi Actions
- AI
For this example, we'll configure three actions: sending an email, adding a follower, and creating a follow-up activity.
3. Send an Email Automatically
Select Send Email from the Type field.
Then select the appropriate Email Template.
In Send Email As, you can choose how the communication should be handled:
Message
Posts the content to the record as a message and makes it available in the messaging history.
Email
Sends the communication directly to the configured recipients.
Note
Adds the content as an internal note that is visible to internal users.
For a customer-facing notification, select the option that matches your communication requirements.
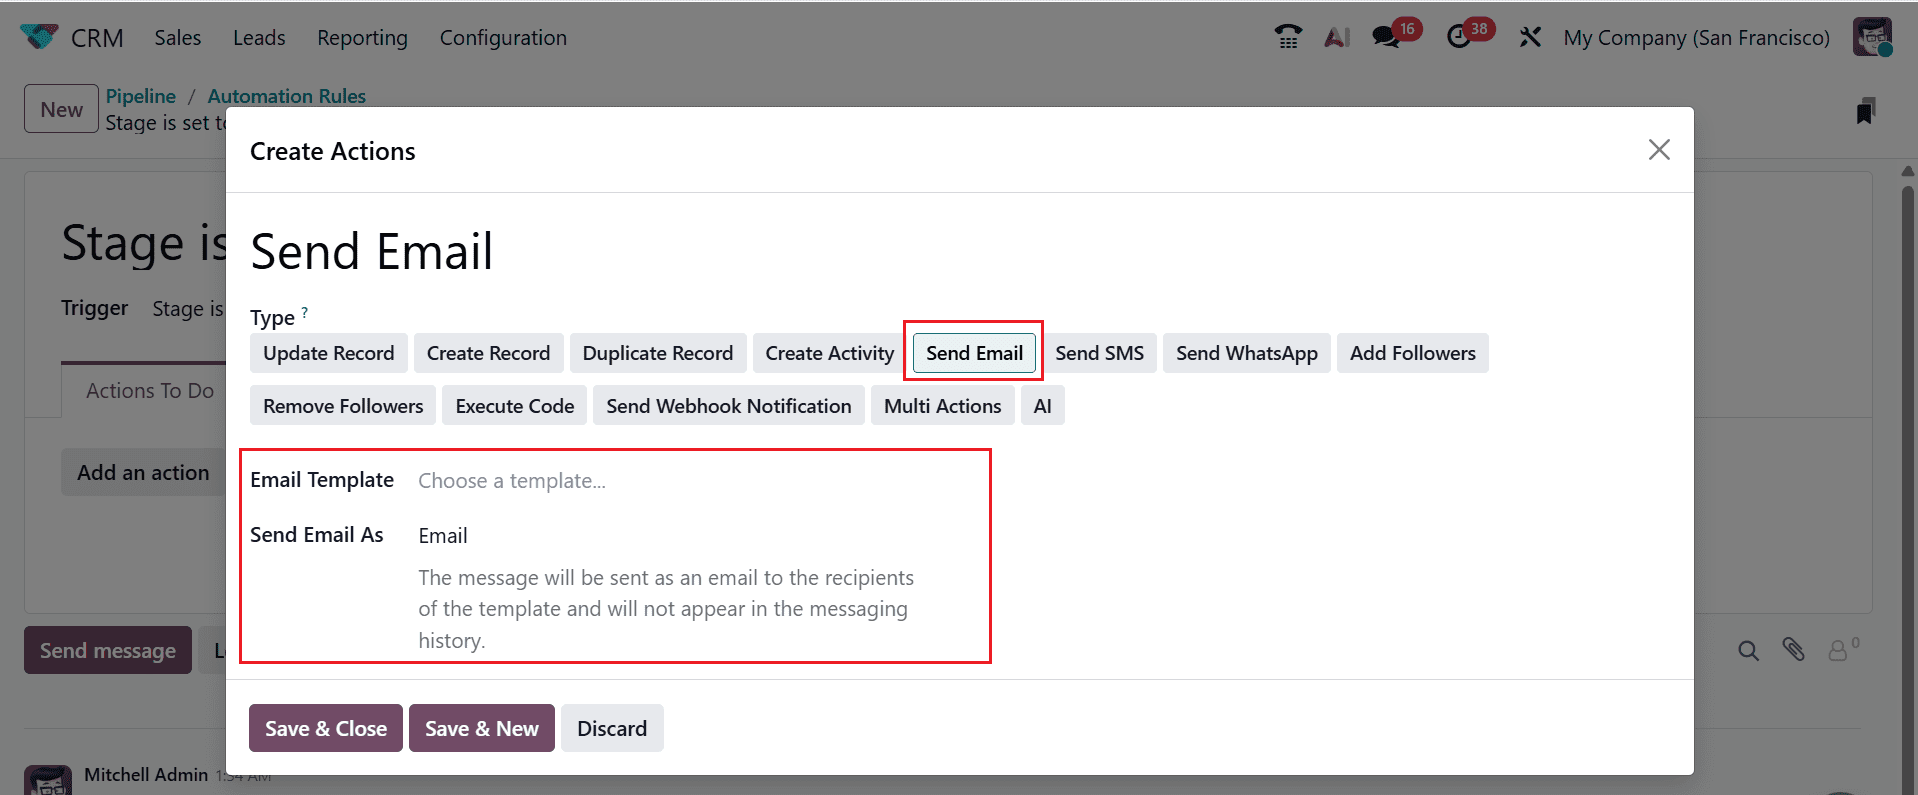
Click Save & New to add another action to the same automation rule.
4. Add a Follower Automatically
For the second action, select Add Followers as the action type.
In Followers Type, you can choose between specific and dynamic followers, depending on how you want Odoo to determine who should be added.
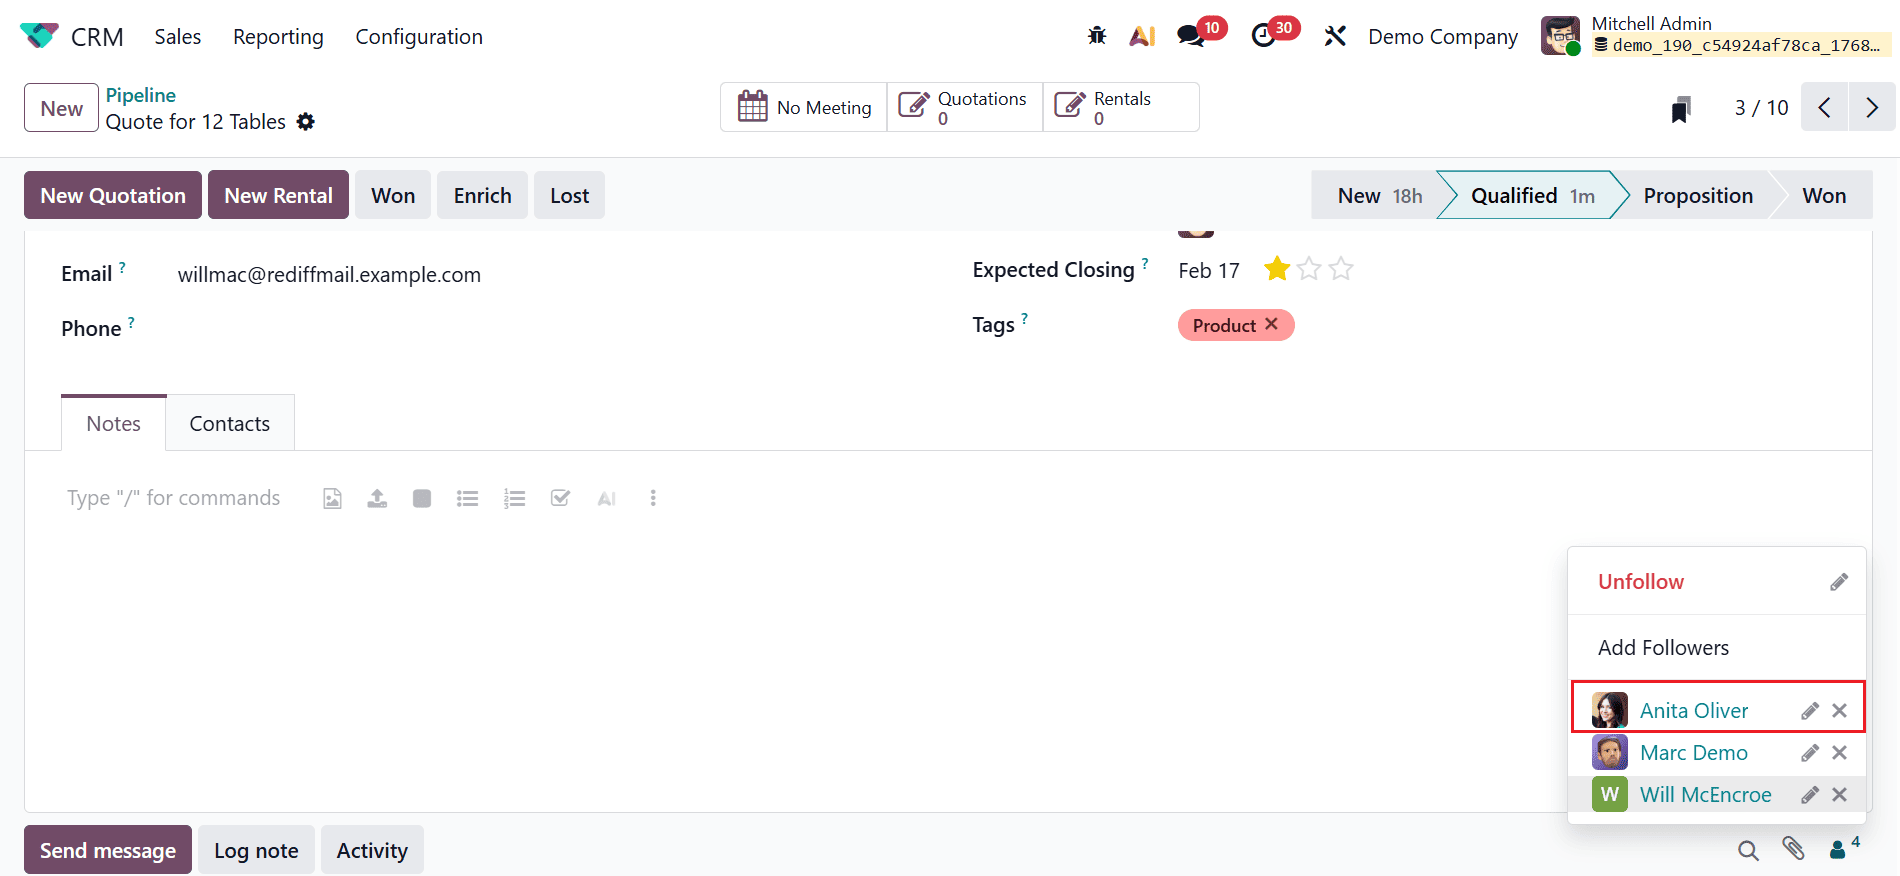
For this example, select the appropriate contact in Followers to add.
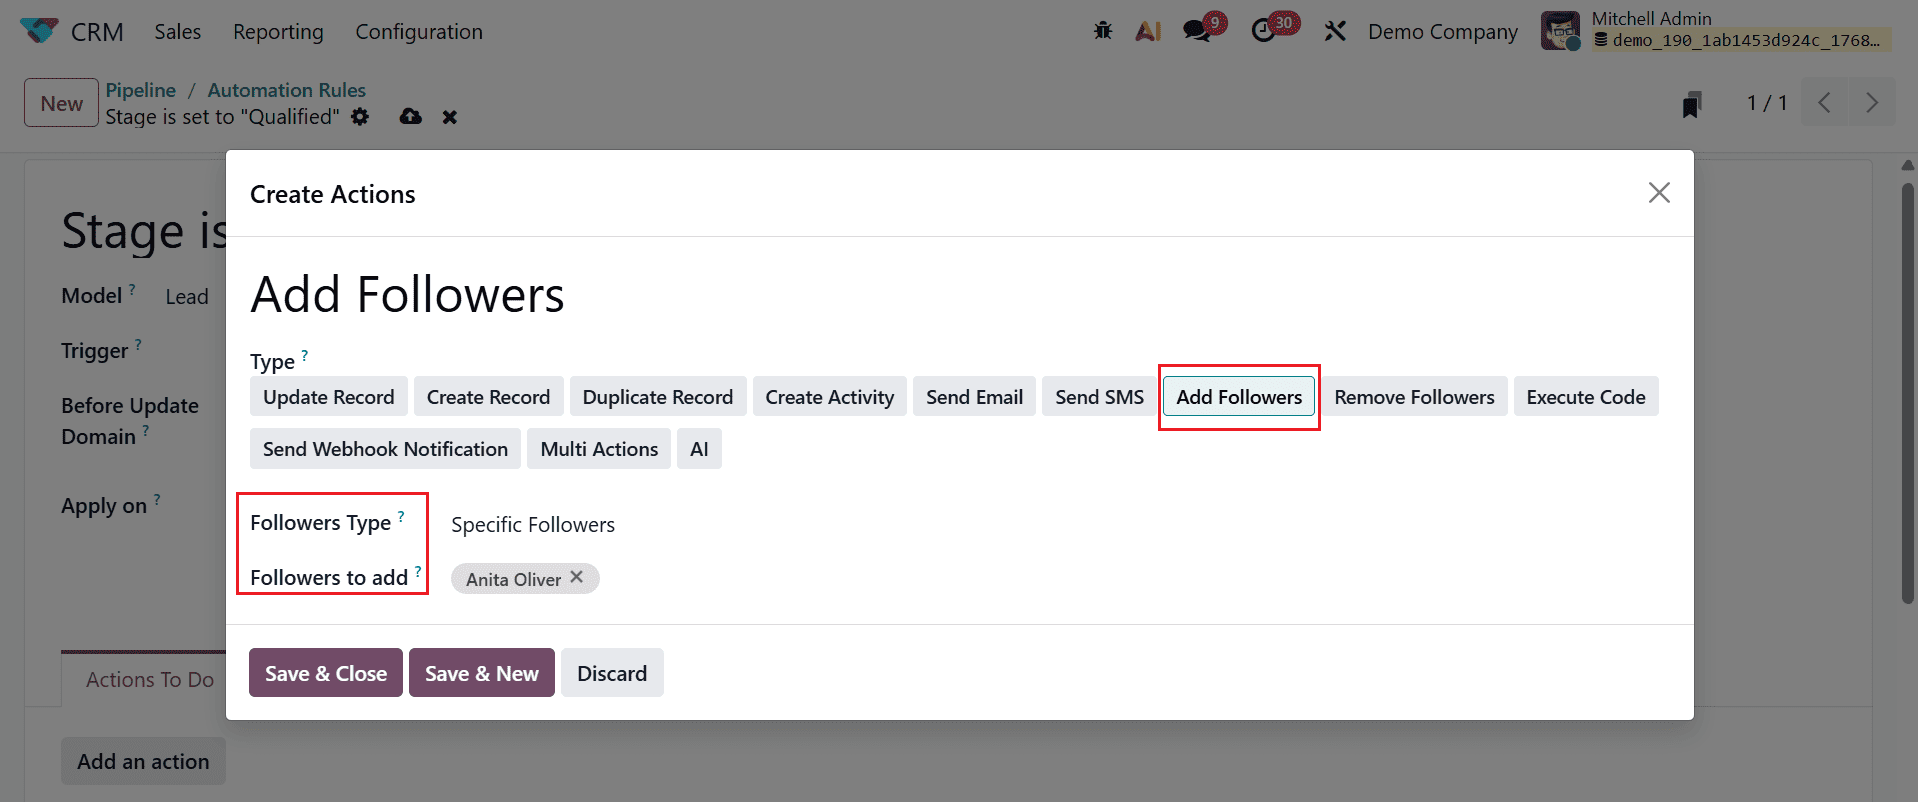
Click Save & New to add the final action.
5. Create a Follow-Up Activity
Select Create Activity as the action type.
Configure the activity using the available fields, including:
- Activity Type
- Title
- Due Date
- User Type
- Responsible
- Note
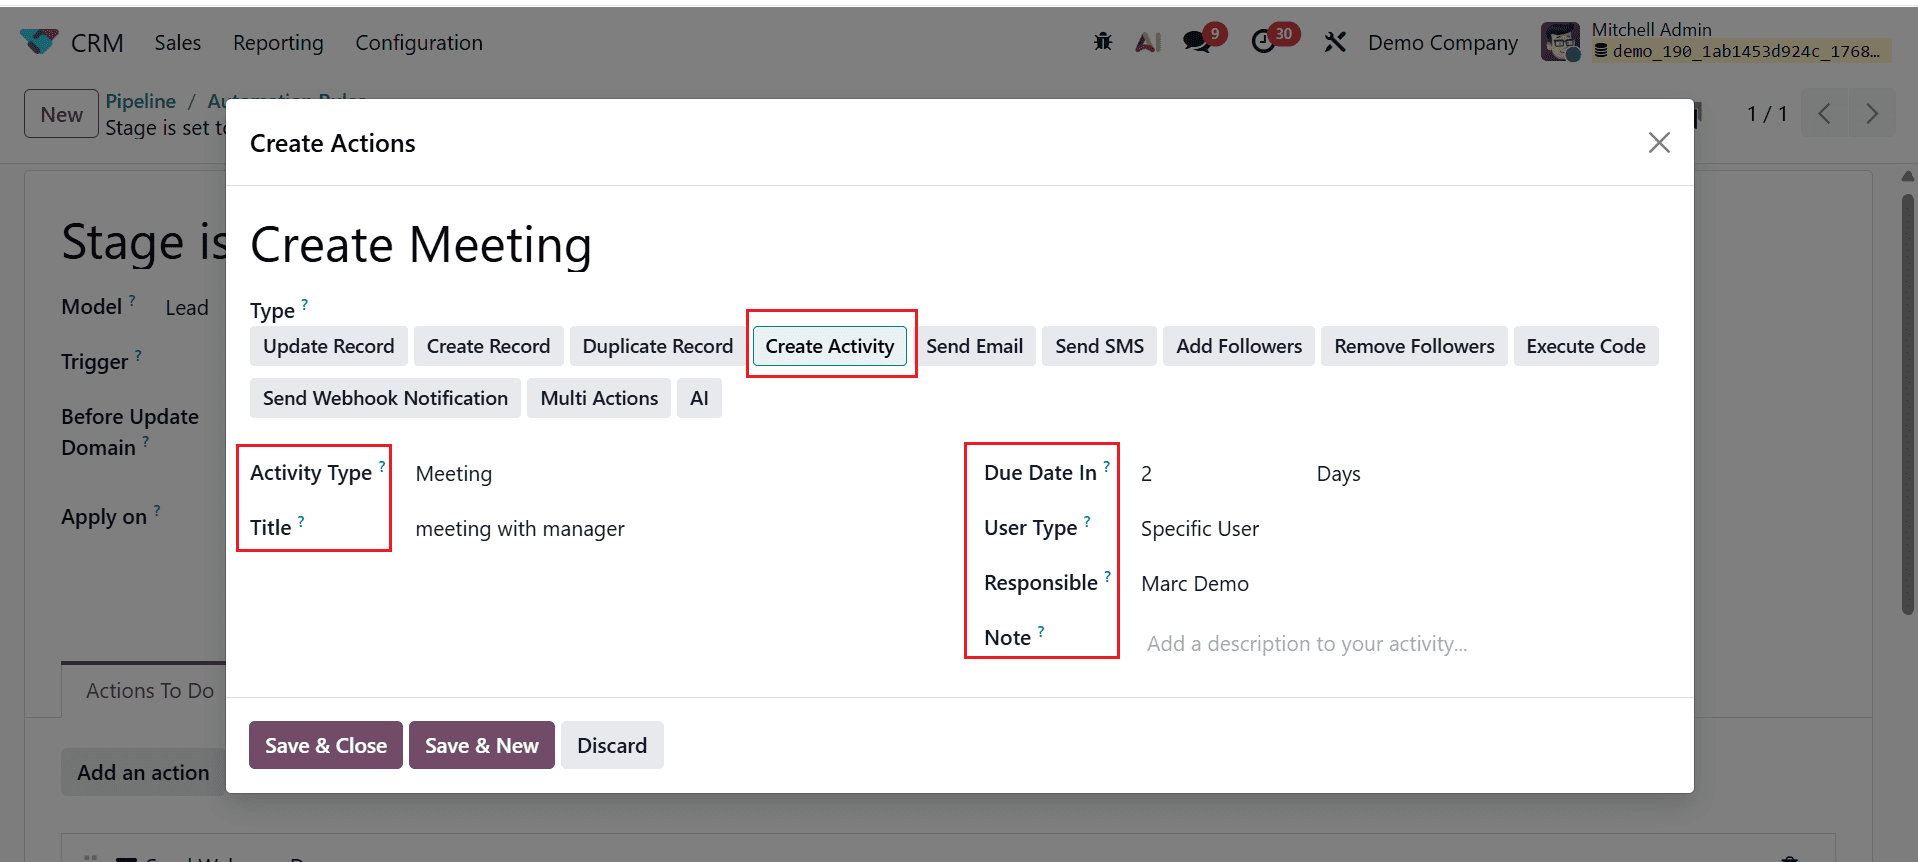
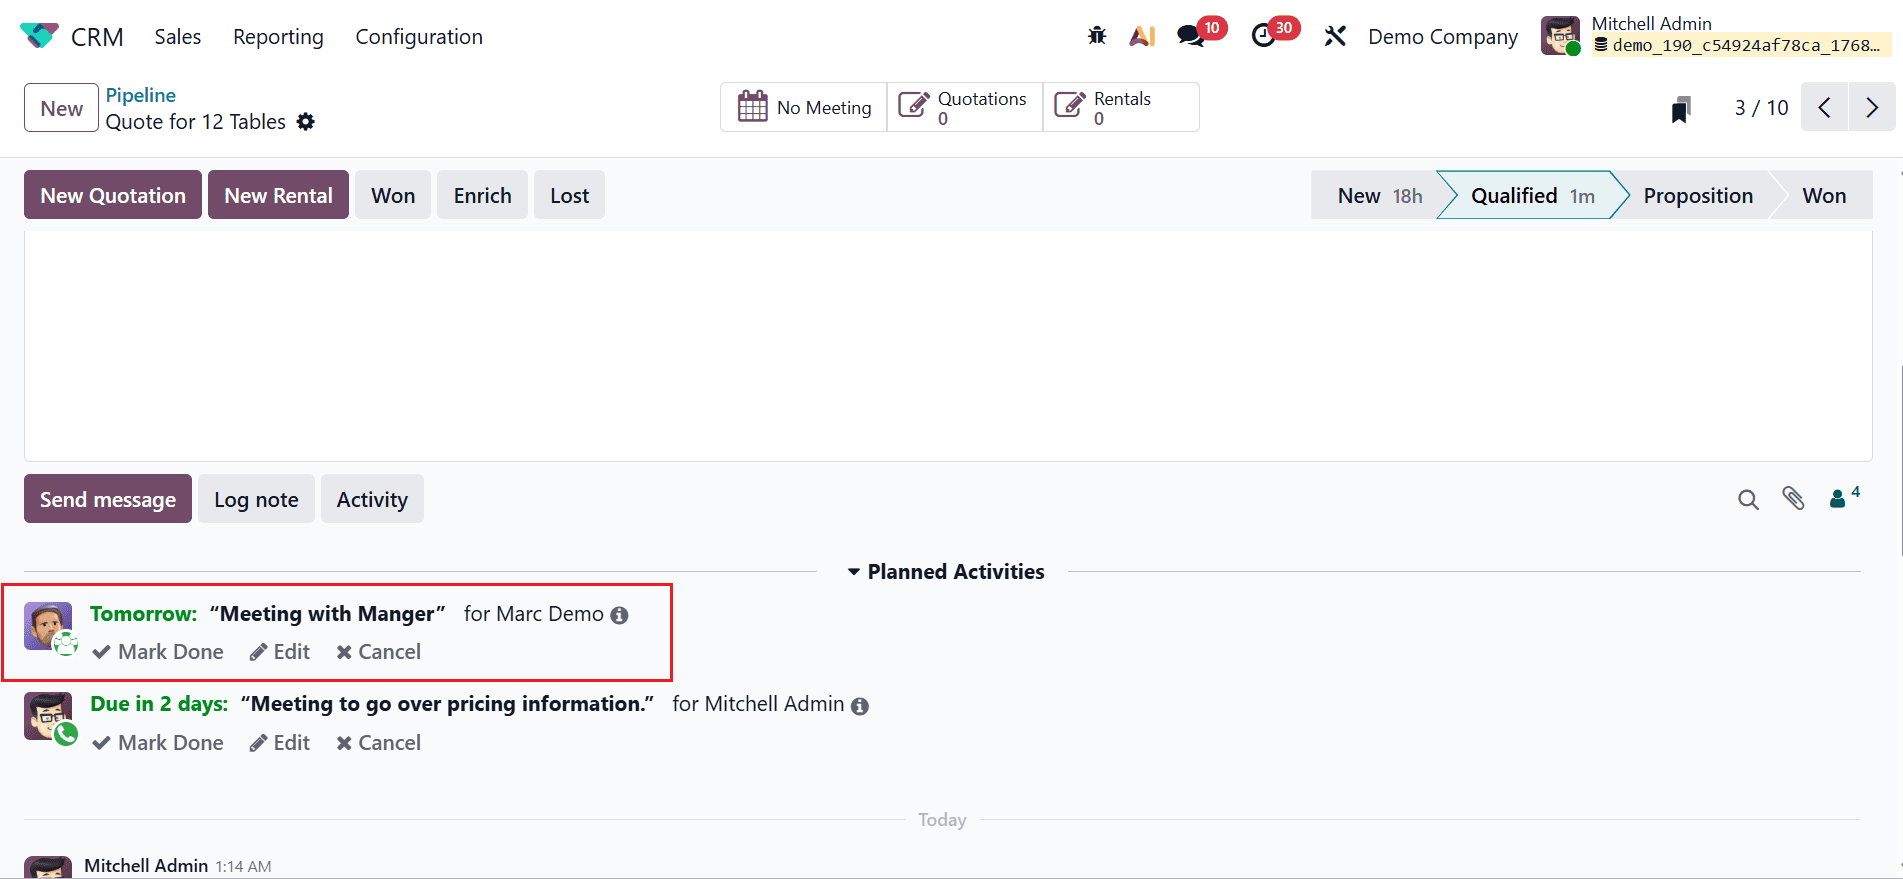
For example, you can create a meeting or follow-up activity and assign it to the appropriate salesperson.
Once all three actions have been configured, save the automation rule.
How the CRM Automation Works
With the automation rule configured, the workflow will look like this:
Opportunity moves to Qualified → Automation Rule is triggered → Email is sent → Follower is added → Follow-up activity is created
This removes the need for the sales team to perform each of these actions manually.
How to Test the Automation Rule
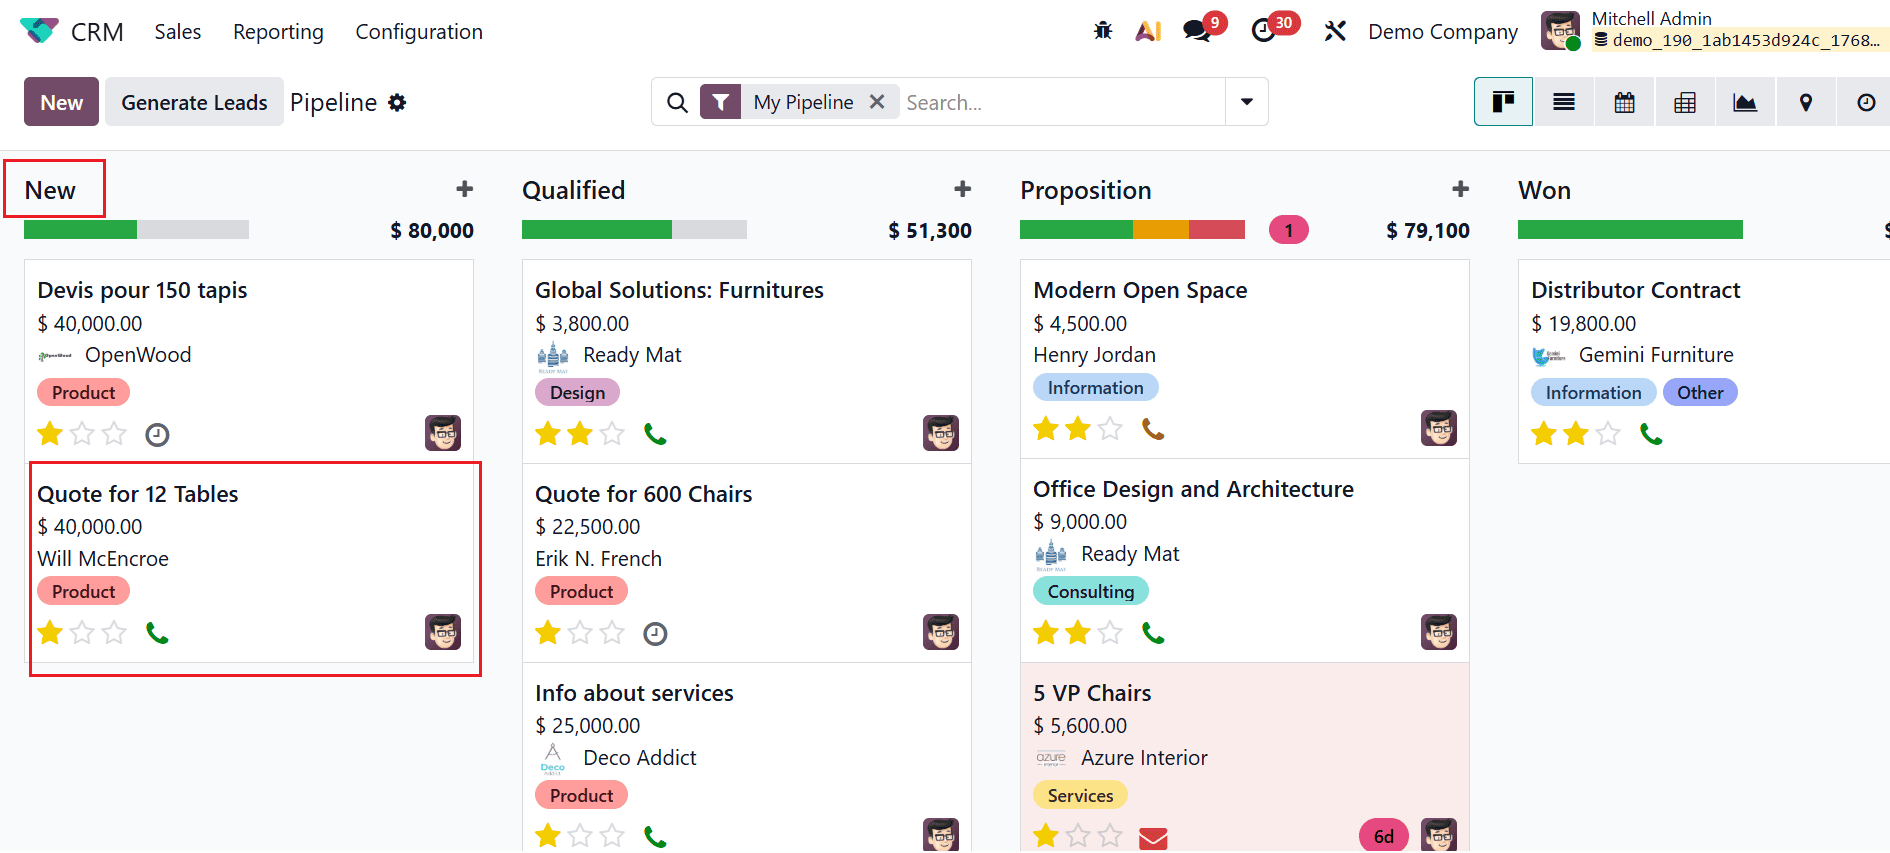
After configuring the automation rule, return to the CRM pipeline and open an opportunity. In this example, we'll use the opportunity Quote for 12 Tables.
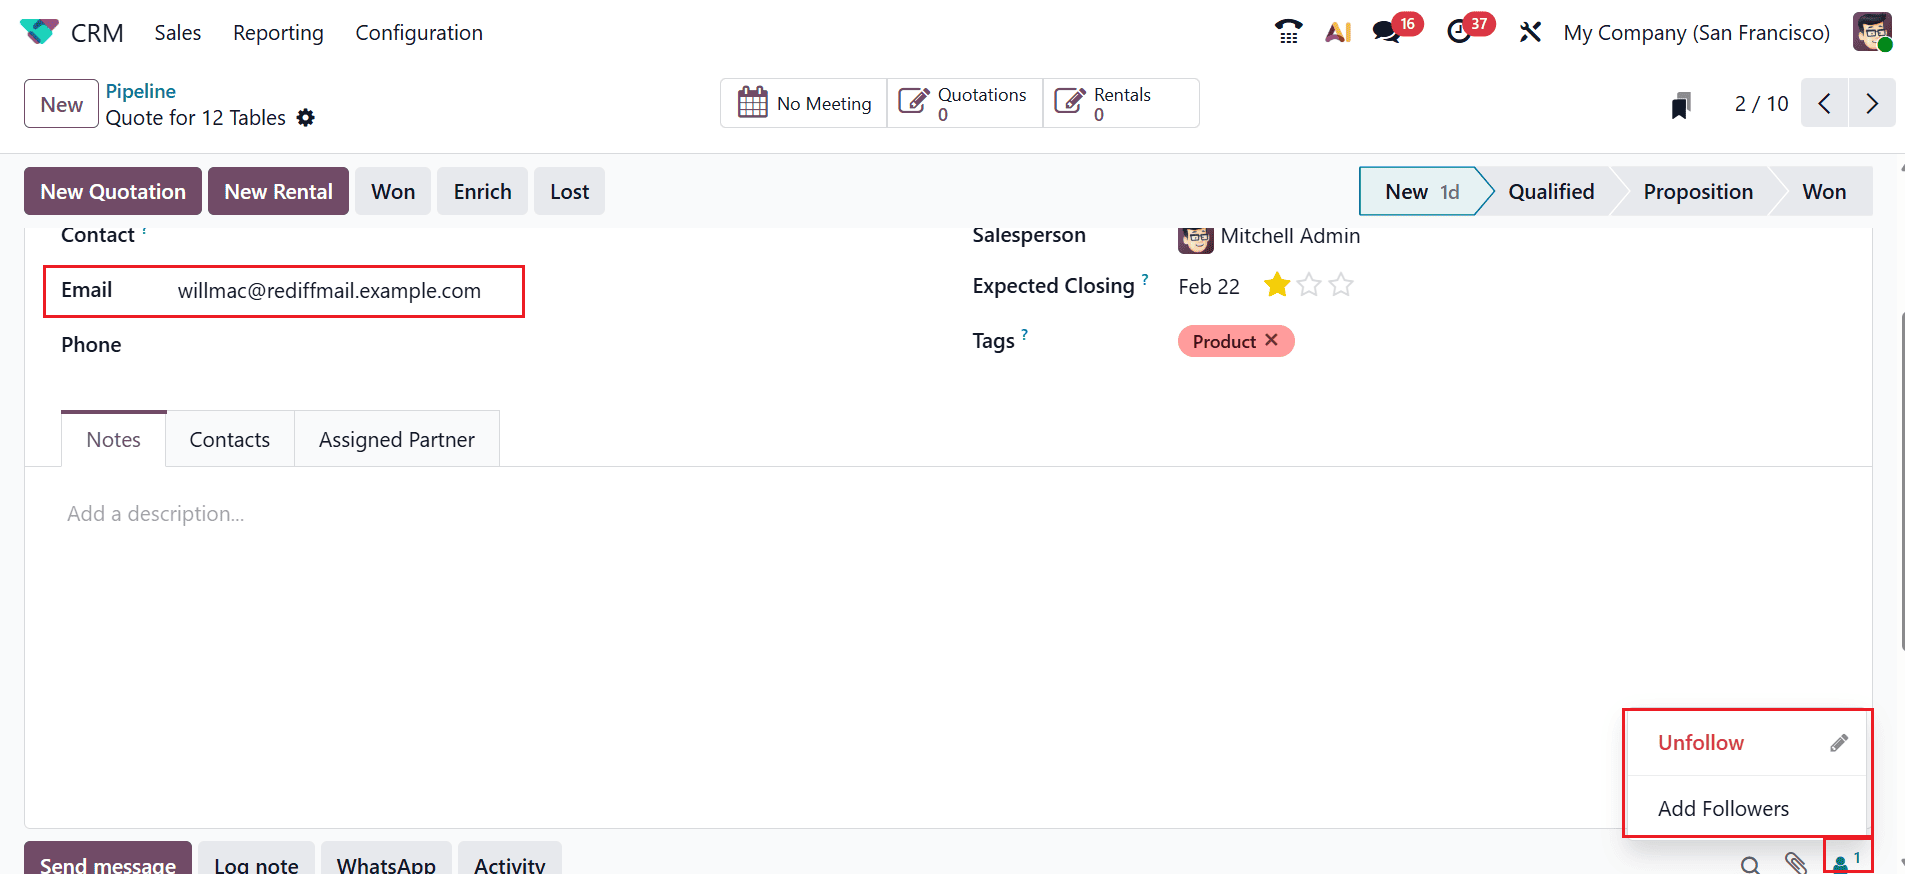
Before testing the automation, verify that the opportunity contains a valid email address.
In this example, only Mitchel Admin is listed as a follower, and you can remove this follower if required.
Now, change the selected opportunity from New to the Qualified stage, as shown below:
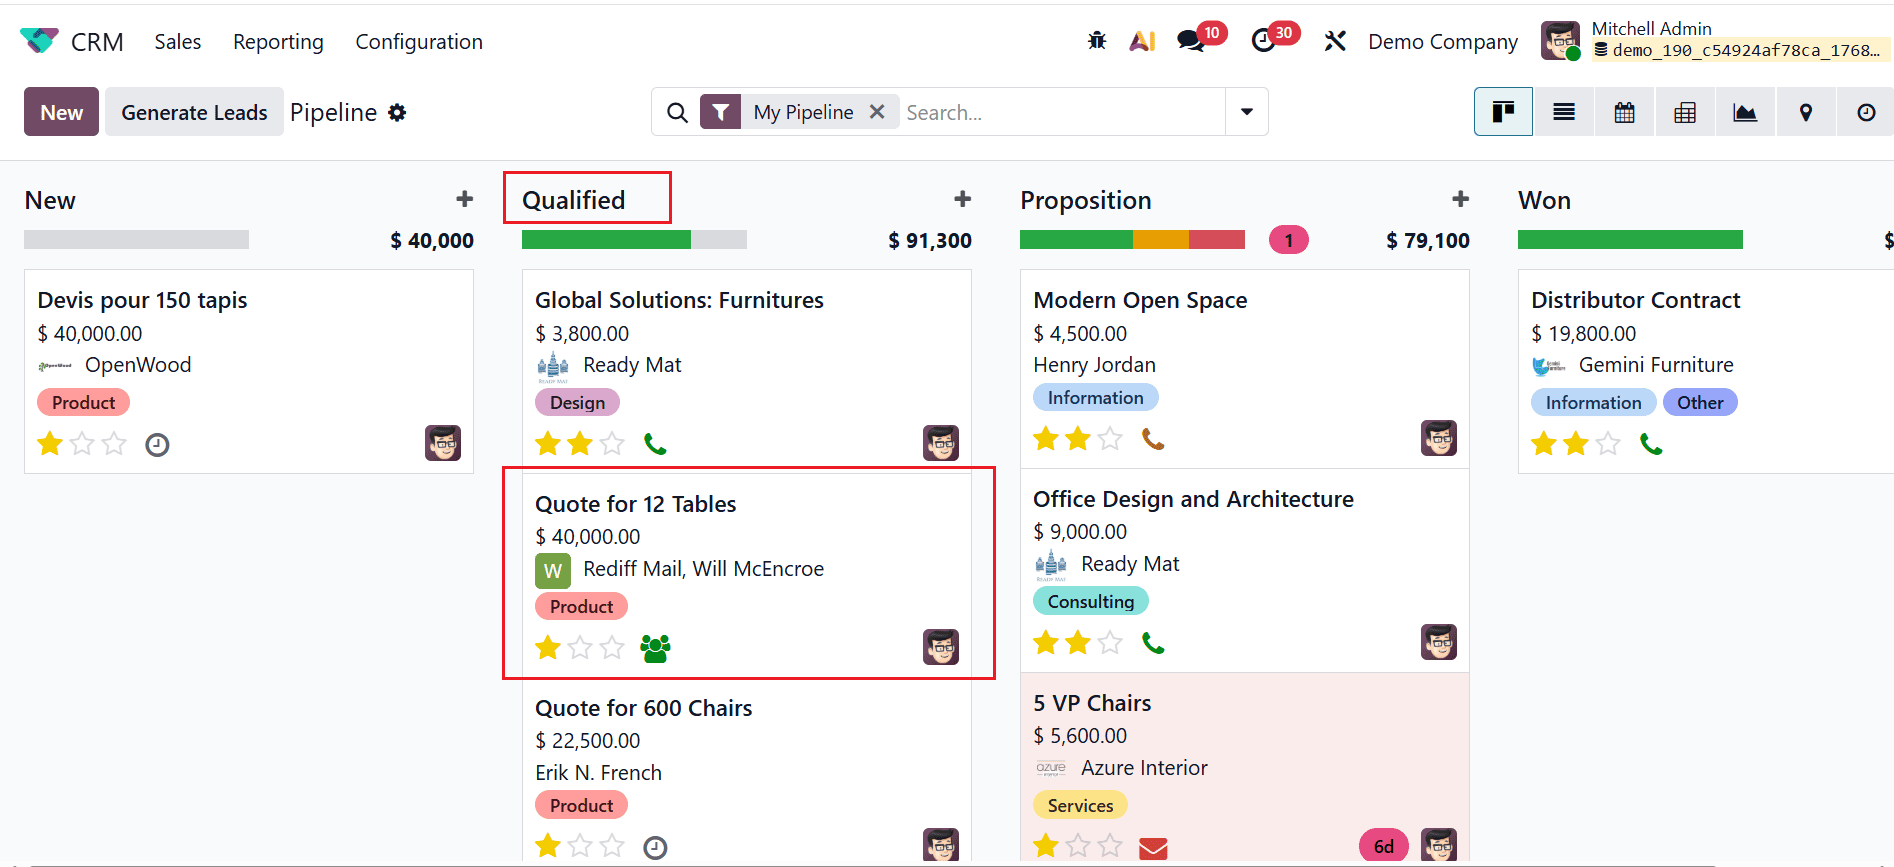
After the opportunity reaches the Qualified stage, Odoo should automatically execute the actions configured in the automation rule.
First, verify that the configured email has been sent.
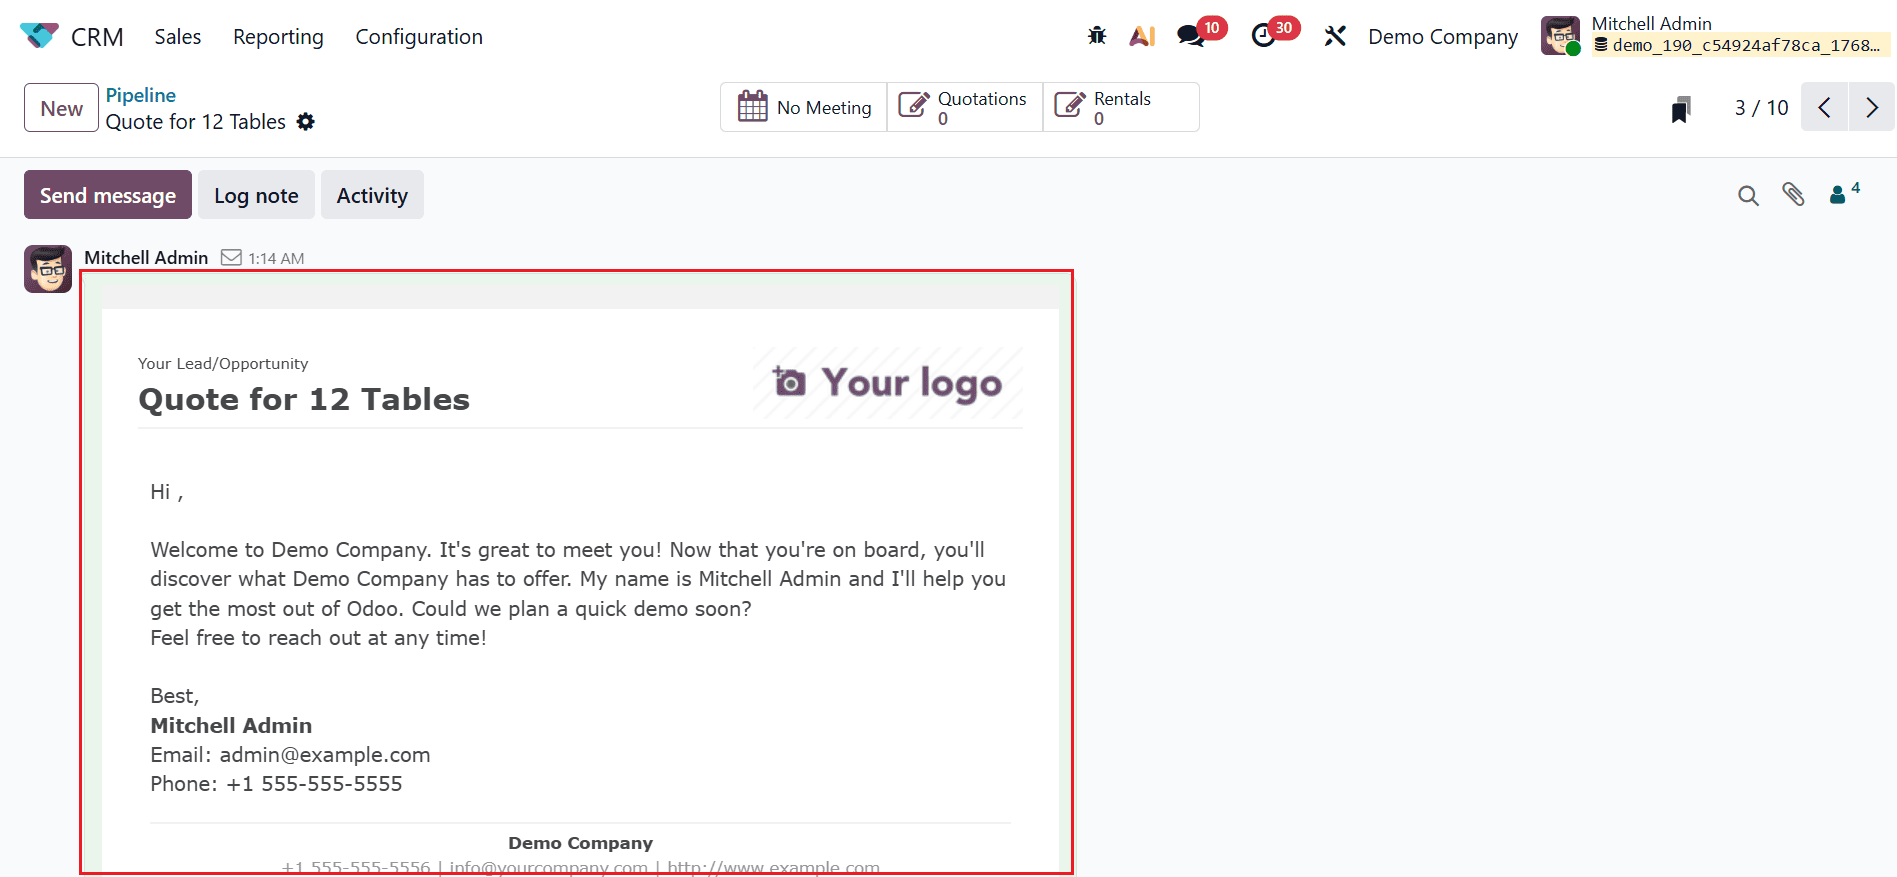
Next, open the scheduled activity to confirm that the follow-up activity was created with the correct details.
Finally, check the opportunity's followers to confirm that the designated contact was added automatically.
Why Use Automation Rules in Odoo 19 CRM?
Automation Rules in Odoo 19 CRM can help businesses standardise repetitive CRM processes and reduce the amount of manual work required from sales teams.
Depending on the workflow, businesses can use them to:
- Notify customers or salespeople when an opportunity reaches a specific stage
- Automatically create follow-up activities
- Assign or notify team members
- Update CRM records
- Add or remove followers
- Trigger additional workflows based on specific conditions
The key is to design automation rules around clearly defined business processes. Automating unnecessary or poorly defined processes can create additional work instead of reducing it.
Key Takeaway
Odoo 19 CRM Automation Rules provide a flexible way to automate repetitive sales tasks and create more consistent workflows. By combining triggers, conditions, and automated actions, businesses can ensure that important steps are completed whenever an opportunity reaches a specific stage.
In this example, a single automation rule automatically sends an email, adds a follower, and creates a follow-up activity when an opportunity reaches the Qualified stage. Similar rules can be adapted to other stages and sales processes based on your business requirements.