eLearning App

Sections

Getting Started

Features


As you embark on your journey with the E-learning app, you're entering a realm of dynamic possibilities for training and development within your organization. This powerful tool empowers HR professionals to streamline course management, enhance employee learning experiences, and drive organizational growth. From creating engaging courses to tracking learner progress, the E-learning app offers a comprehensive suite of features designed to elevate your training initiatives. Let's explore some of the key features that make this app an indispensable asset in your HR arsenal.

Features Description
e-Learning Portal A portal where your employees as well as contractors can take courses.
Mandatory Training Plans You can set up and automate any regulatory trainings.
Content Creation You can create your own course through our tool with options to add images, videos, PDF, web pages and much more.
SCORM Files with Component Tracking Our system fully supports SCORM files with tracking for each component.
Bulk Enrollment Employees and contractors can be enrolled into any plan in bulk.
Assessments You can set up assessments through our app with any type of scoring you want.
Comprehensive Reports We have a number of useful reports which can be further customised as per your needs.

Accessing the E-learning Module


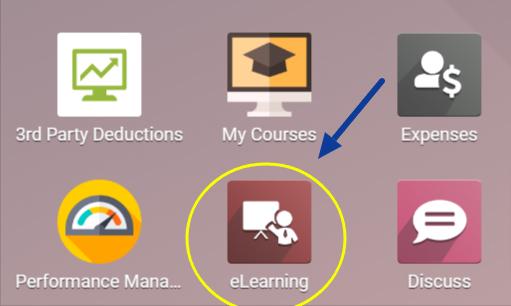
To access the e-learning module within the NumlaHR solution, begin by logging in with the credentials provided by your organization. Once logged in, you'll find yourself on the main dashboard, which serves as the central hub for accessing various features and functionalities. To navigate to the e-learning module look for an app with an icon shown below, or you can just type “E-learning” on the screen to find it.

Navigating to the e-learning app in Numla HR

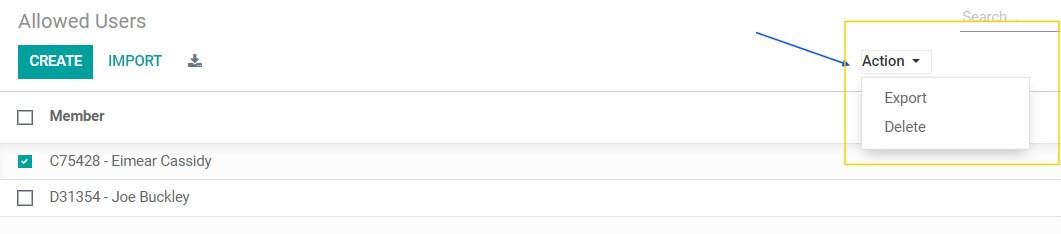
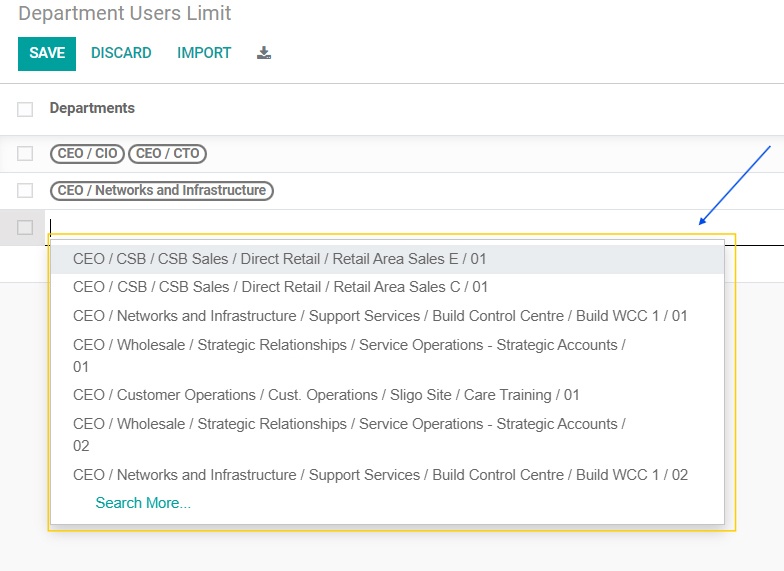
User Roles and Permissions


Role Access Level Details
Super Users Full Access Can access everything within the eLearning module, including all features and configuration.
HR Restricted Access Can access reporting and courses data.
Employee Restricted Access Can only access the courses.


Setting Up the E-learning App

This section is all about the important things you need to set up before using the e-learning app to its full potential. We will go with each point in detail.

Course Tags


It pertains to the categorization or classification of courses within the e-learning app. It allows users to organize and group courses based on common themes, topics, or attributes, making it easier to search for and access relevant training materials.

Course Tags Configuration

  • To access this setting go to E-learning > Configuration > Course Tags.
  • To add a new value, click on “Create”, enter the type name, and “Save” it.
  • To edit any existing value, just click on it and click “Edit”, make the change, and then click on “Save”.

Editing the course tag

  • To delete any value, first select it using the available checkbox on the left. Then go to “Actions” and select “Delete”.

Deleting a Course tag

Content Tags


Content tags could be utilized to categorize courses, training materials, or resources based on topics, departments, or other relevant criteria.

Content Tags Configuration

  • To access this setting go to E-learning > Configuration > Content Tags.
  • To add a new value, click on “Create”, enter the name, and “Save” it.
  • To delete any value, first select it using the available checkbox on the left. Then go to “Actions” and select “Delete”.

Deleting a Content tag

HR - eLearning Course Mapping


This enables you to held to align their training content with their HR objectives and priorities, ensuring that employees receive targeted learning experiences tailored to their roles and career development paths.

eLearning Course Mapping Configuration

  • To access this setting go to E-learning > Configuration > HR - eLearning Course Mapping.
  • To add a new value, click on “Create”, enter the course name, related ID in e-learning, and content mapping by clicking Add a line, and “Save” it.
  • To edit any existing mapping, just click on it and click “Edit”, make the change, and then click on “Save”.

Adding a content mapping

  • To delete a value, select the value on the contract category list using the checkbox on the left.
  • Go to "Actions" and choose "Delete".

Deleting a course mapping

All About the E-learning App

Let’s dive into the most common use of this app. Creating a new course or modifying an existing one. If you’re an HR personnel, you can navigate to the E-learning app and the first screen you see is the list of all courses.

Creating a New Course


Go into the e-learning app, and click on “Create”.

Creating a new course

Filling Out Mandatory Fields

These are the minimal set of fields you must know to start creating an employee profile in the system. All mandatory fields are highlighted with a bold underline. Start with completing them first, as you cannot save your record without filling them.

Filling out Mandatory fields

Adding Content Information

You can add a description for a course by following these simple steps:

  • Navigate to the e-learning overview within the E-learning app, and open it.
  • Click on “Add content”, then go to the Create Slides and Categories section.

Adding Content Information

  • Now click on the area for Type and then select the given type.


Adding Description

You can also add a description of the course.

Adding Description

Selecting Options

You can also add the options given below.

Selecting Options

Adding Karma Rules

Adding Karma Rules

Viewing Ratings

Viewing Ratings

  • Save after adding all details mentioned above.

Save course

Mail body

Recipients

  • After writing the email select the option “send”.

Send email

Adding Attendees

Adding Attendees

  • Click on attendees and then click on “create”.

Create attendee

Plan


This includes all e-learning plans made.

Plans 

  • To access this setting go to E-learning >Plans.
  • To add a new plan, click on “Create”, enter the name, start date, and end date, and “Save” it.

eLearning plan

  • After filling in the required information click “Proceed to add courses”.

Add courses

  • After clicking on proceed to add courses you will be directed to “course selection” where you have to select the courses.

Course selection

  • Click on add a line to add the courses.

Create course

  • You can also create a new course by clicking on “create”.

Add course

  • After selecting the courses click on “Confirm”.

Confirm

  • Then you will be directed to enrollment process.

Enrolment

  • To enrol users in the courses, you must upload an Excel file containing two columns. The first column should have identifiers: "E" for employee or "C" for contractor, and the second column should contain the staff ID for employees or email for contractors.

Confirm enrolment

  • After enrolling users, first click on "Process Upload File" to upload the Excel file, then click on "Confirm Enrollment”.

Publish plan

  • After the enrollment process, click on "Publish Plan", and you will be directed to send invites. Invitations will be sent to them automatically.

Save plan

  • After going through all the processes, save it.
  • If you want to enroll more users, click on "Add Students."

Add students

Send invites

  • If you want to close the plan, click on "Close Plan."

Close plan

  • You can also view the course reports by clicking on "Reports," and you can download the report from there.

Reports

  • To edit any existing plan, just click on it and click “Edit”, make the change, and then click on “Save”.

Edit plan

Reporting

It refers to the functionality that allows users to generate and analyse various types of reports related to the e-learning app.

Courses


In this report, you can view course details such as visitor numbers, attendee counts, votes, and average star ratings.

To access this report, navigate to E-learning > Reporting > Courses.

Courses

Contents


Our content reporting feature provides a comprehensive chart that details key metrics for each course. This chart enables us to measure various aspects of course performance, including attendance rates, engagement levels, completion rates, and user feedback. By analyzing these metrics, we can gain valuable insights into the effectiveness of our courses and identify areas for improvement.

To access this report, navigate to E-learning > Reporting > Contents.

Contents 

  • You can measure the following shown in the picture.

Measures

Ratings​


Ratings 

Quizzes​


In the quizzes reporting, you can find detailed information about each quiz, such as the questions included, question names, the content of each question, attempt counts for each question, average attempt per question, and the total number of quizzes completed. Additionally, the report includes performance metrics for individual questions, such as success rates and average scores, providing insights into learner comprehension and engagement with the quiz content.

To access this report, navigate to E-learning > Reporting > Quizzes.

Quizzes 

Certification​


Certification 

Scorm Tracking​


Here you can find a detailed analysis of all of your SCORM courses. It shows the progress made by each user on each content.

You can check the completion percentage of all the sections and report on them using our extension filters and group by options.

SCORM Tracking 

Configuration

In this section, we can show them how the configurations can be updated to meet the changing needs of an organisation.

Slide Partner


  • First, navigate to the “E-learning App” and go under “Configuration”.
  • From there, select Slide Partner to create a new job position.
  • Here, you can input details such as the “slide”, partner, and other relevant information.
  • Once entered, “Save” the changes.

Slide Partner

To edit any existing value, just click on it and click “Edit”, make the change, and then click on “Save”.

Edit Slide Partner

To delete any value, go to “Actions” and select “Delete”.

Edit Slide Partner 

Attendee Course Status


  • First, navigate to the “E-learning App” and go under “Configuration”.
  • From there, select Attendee Course Status to create a new course status for an attendee.
  • Here, you can input details such as the “Attendee, partner, course, plan, slide partner”, partner, and other relevant information.
  • Once entered, “Save” the changes.

Attendee Course Status

SCORM Components


  • Start by accessing the “E-learning App”, then proceed to “Configurations”.
  • Within “Configurations”, locate and select Scrom components.
  • Next, click on the “Create” option. Here, you'll fill in the necessary details about the SCORM components. 
  • “Save” the details.

SCORM components

To add child components, click on "Add a Line" and then fill in all the necessary information.


To delete any value, first select it using the available checkbox on the left. Then go to “Actions” and select “Delete”.

Scorm components deletion

SCORM Component Types


  • To configure the Scrom Component types, start by accessing the "E-learning App" and navigating to the "Configurations" section.
  • From there, select "Scrom Component types". Within this menu, opt for the "Create" option to initiate the setup process. Here, input all relevant details.
  • Once all required information is entered, remember to “Save” it.


To add components, click on "Add a Line" and then fill in all the necessary information.


To delete any value, first select it using the available checkbox on the left. Then go to “Actions” and select “Delete”.


Allowed Users


  • Start by accessing the “E-learning App”, then proceed to “Configurations”.
  • Within “Configurations”, locate and select Allowed Users.
  • Next, click on the “Create” option. Here, you'll fill in the “Name”.
  • “Save” the name.

Allowed Users 

  • To delete a name, select the name on the Allowed users list using the checkbox on the left.
  • Go to "Actions" and choose "Delete".

Delete allowed users

Department Users Limit


  • Start by accessing the “E-learning App”, then proceed to “Configurations”.
  • Within “Configurations”, locate and select Department Users Limit.
  • Next, click on the “Create” option. Here, you'll fill in the “ Department Name”.
  • “Save” the name.

Department Users Limit 

FAQs

You can use the following components to craft a course:

  • Images
  • Videos
  • PDF
  • HTML Pages
  • Quiz
  • Assessments
  • SCORM
Can we restrict the number of attempts for an assessment?

Yes, you can restrict the number of attempts as well as add a time limit on assessments.

Glossary

Term Description
SCORM Sharable Content Object Reference Model
HTML Hyper Text Markup Language - used to display web pages

Version History

1.0

Prepared By

Palwasha Azher

Date Updated

19/05/2024