Timesheets App

Sections

Getting Started

Features


In this section, we'll provide an overview of the key features offered by the Timesheets app, crafted to enhance time management efficiency and productivity within your organisation. From capturing accurate time entries to facilitating review processes, this app offers a comprehensive set of tools to streamline your workflow. Below, you'll find a curated list of features presented in alphabetical order, ensuring easy navigation and understanding. Let's explore these features to unlock the full potential of the Timesheets app.

Features Description
Integration with Time-Off Specify absence timecodes for leave tracking via timesheets.
All Timesheets in One Place Access all submitted timesheets for HR review and processing.
Appropriation Codes Assign appropriation codes to timesheet entries for cost tracking.
Customers Ticket Track customer-related tasks or tickets within timesheets.
Multiple Timesheets Format Choose from 4 timesheet layouts, with customisable working weeks.
Reporting Generate detailed reports and analytics for informed decision-making.
Timesheet Allowances Setup Configure employee allowances for timesheet claims.
Timesheet Delegation Delegate timesheet access for review and approval during absences.
Overtime Rules Set up various overtime rules to accommodate different scenarios.
Subsistence Record subsistence on timesheets with input validations.
Automated Feed to Payroll Automatically feed approved timesheets into payroll processing.

Accessing the Timesheet Module


To access the Timesheet module within the NumlaHR solution, begin by logging in with the credentials provided by your organisation. Once logged in, you'll find yourself on the main dashboard, which serves as the central hub for accessing various features and functionalities. To navigate to the “Timesheets” module look for an app with an icon shown below, or you can just type “Timesheets” on the screen to find it.

Navigating to the timesheets app in Numla HR

User Roles and Permissions


Role Access Level Details
HR Super Users Full Access Can access everything within the timesheet module, including all features and timesheet data.
Payroll Team Restricted Access Can access everything except timesheet configurations.
Managers Restricted Access Can only access timesheets for themselves and their team.
Employees Restricted Access Can view and create their own timesheets only.


Setting up the Timesheets

Setting up the Timesheets app lays the foundation for efficient time tracking and management within your organisation. Proper configuration ensures that employees can accurately record their time, managers can effectively monitor work hours and projects, and administrators can generate insightful reports to support decision-making processes. In this section, we'll guide you through the step-by-step process of setting up the Timesheets app, covering essential tasks.

Absence and Time Code Mapping


Absence timecode mapping in the Timesheets app serves as the cornerstone for accurately recording various types of employee leave, including vacation, sick leave, holidays, etc. HR managers can configure these timecodes to reflect the organisation's leave policies and entitlements, ensuring that employees can easily report their absences while maintaining compliance with company regulations.

Absence and Timecode Mapping Configuration

  • To access this go to Timesheets > Configuration > Absence and Timecode Mapping.
  • To add a new value click on “Create”, enter the time off type, and “Save” it.
  • To edit any existing value type just click on “Edit”, make the change, and “Save” it.

Creating new mapping

  • To delete any value, first select it using the available checkbox on the left. Then go to “Actions” and select “Delete”.

Deleting an absence and timecode mapping

Timesheets Allowances Setup


Timesheet allowances help organise and streamline management of employee time tracking and compensation. Each allowance type is defined based on specific criteria such as overtime, shift differentials, call out, on call, holiday pay and much more. The setup process involves defining parameters such as the allowance name, type, applicability to employee groups, and association with salary rules or codes and a formula to calculate the allowance value.

Timesheets Allowances Setup Configuration

  • Navigate to Timesheets app, select Configuration, and then Timesheets Allowances Setup.
  • To add a new allowances setup, click on “Create”, enter the name, type, applicable to, salary rule, etc then “Save” it.

Creating Timesheets Allowances Setup

  • To Export, Archive, Unarchive, or Remove params of any value, first select it using the available checkbox on the left. Then go to “Actions” and select desirable.

Exporting/Archiving/Unarchiving or Removing params from timesheets allowances setup

All About Timesheets

Let's explore one of the fundamental functions of the Timesheets app: managing and submitting time entries. If you're an employee or a manager, accessing the Timesheets app presents you with an overview of your time-related activities. Here, you can easily record your work hours, submit time entries, and review your time-tracking history. For administrators, this is the central hub for overseeing and managing the timekeeping process for all employees. Whether creating new time entries or editing existing ones, the Timesheets app provides a user-friendly interface for efficient time management.

Creating a new Timesheet e-Diary Timesheet


Go to the timesheets app, and click on “Create”.

Creating a new Timesheet

Filling out Mandatory fields

These are the minimal set of fields you must know to start creating a Timesheet in the system. All mandatory fields are highlighted with a bold underline. Start with completing them first, as you cannot save your record without completing them.

Filling out Mandatory fields

The mandatory fields are as follows:

  • Start date
  • End date
  • Employee

After filling up these fields, click on Proceed and your timesheet will move to the Time Entry stage.

Time Entry stage

  • Once you’re done with the time entry phase, you can click Next and your timesheet will be moved to the Claim Allowances stage.


  • To claim an allowance, simply click on Add Details it will open a pop-up window, enter the requested details.
  • After claiming all the allowances, click on Next and your timesheets will move to the Claim Subsistence stage.

Claim Subsistence stage

  • To remove a subsistence, just click on the little trash can at the right of each subsistence claim. It will undo all the details you entered.


  • Once you’re good with the subsistence, click on Next, and your timesheets will move to the Appropriation stage.

Appropriation stage

  • Click on Add a line button, a new line will be added and you can add the ordinary/overtime hours and appropriation code.

Add a line

  • When entering an Appropriation Code, the system will instantly suggest the most relevant matches. Keep typing, and once your specific code appears, select it and save the record.


  • Continue adding until you have allocated all your ordinary and overtime hours appropriately.

Appropriation

  • To remove any appropriation, simply click the trash can icon, and it will delete that line.

Remove appropriation

  • Within the appropriation section, you have visibility into your available Time-In-Lieu (TIL) balance. To apply for time off, simply add an appropriation using a UWL (Unpaid Leave) code.

Time-In-Lieu balance

  • Any time-off approved before your timesheet creation automatically comes into your timesheets. However, if you have already created a timesheet and your time-off is approved later then it won’t come into your timesheets unless you delete your current timesheet and create a new one.

Time-off taken

  • After entering your appropriations, click on "Next" to move your timesheet to the Review stage. Here, you can carefully review all the information you've entered before submitting it to your manager.
  • While all tabs are visible during this stage, they are not editable. If you need to make any changes, you must use the "Back" button to return to the relevant stage.

Review stage

  • When you're ready to submit your timesheets, simply click on the "Submit" button. Your manager will then receive a notification to review and approve your timesheets.

Submit timesheet

  • In case you need to delete a timesheet, you can do it by opening it and clicking on the Action, and selecting Delete.

Delete a timesheet

  • You can only delete a timesheet that is not submitted or approved. If you don’t see this Action button, make sure that the editing mode is closed.

Creating (Simple, Activity, and Evros Timesheets)


.First, go to the timesheet app.

Go to the timesheets app 

As a manager, you can access the Timesheets Submission menu, which allows you to:

  • To Approve: Review and approve all submitted timesheets.
  • My Team Submissions: View all timesheets of your direct reports or any delegated team members.
  • My Indirect Reports Timesheets: Access timesheets of your indirect reports, limited to one level only.


If a new timesheet is submitted for your approval, you will receive a notification via email. Additionally, you can review all pending timesheets for your approval in the designated section.

Notification

Clicking on "Timesheet Requests" opens a screen where you can view the details of each submitted timesheet by simply clicking on them. This allows you to easily review the information before taking any action.

Timesheet Requests

Creating a new timesheet for a team member

  • First, navigate to "My Team Submissions" and then click on "Create" to initiate the process of creating a new timesheet for your team.

My Team Submissions

  • Click the "Employee" field and select the desired employee. You can search using their staff ID, forename, or surname.
  • Once selected, proceed to fill in the other required details, and then click on "Proceed" to continue.

Employee field

  • If you wish to edit your team's submitted timesheet, you can utilise the option called "Manager Edit Mode”.
  • However, please note that this feature only works when a timesheet is in the “Submitted stage”.

Manager Edit Mode

  • Once activated, click on "Edit" and proceed to modify the required details. You can navigate to any tab and make the necessary modifications.


  • When you've finished making your changes, click on "Deactivate Manager Edit Mode."
  • This action will save and implement your changes.
  • It's crucial to deactivate this option because if left active, the updated values might not be integrated into the payroll system.

To approve or reject a timesheet, click the Approve or Reject button.

Approve or reject a timesheet

This action will open a window showing a summary of what has been claimed by an employee. You can review the details within this window.

Summary

If you wish to approve or reject the claimed details, select the "Action to Perform" and then click on "Proceed" to continue with your decision.


Once the timesheet is approved, it becomes locked for modification. However, if you still require amendments, the next option is available for you.

Sending a timesheet back to the employee

To make changes in approved or rejected timesheets, you can utilise the option called "Send Back to Employee."

Send Back to Employee

This action sends the timesheet back to the Review stage, where it can be modified by either the employee or the manager. Subsequently, it can be resubmitted for approval. However, please note that this option is only available if the payroll process has not yet begun.

Reporting

Reports are essential for examining your data in a meaningful manner and extracting value from it. Here are the reports available in our system:

Team Timesheets


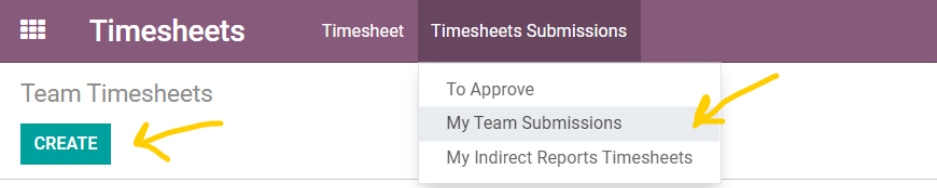
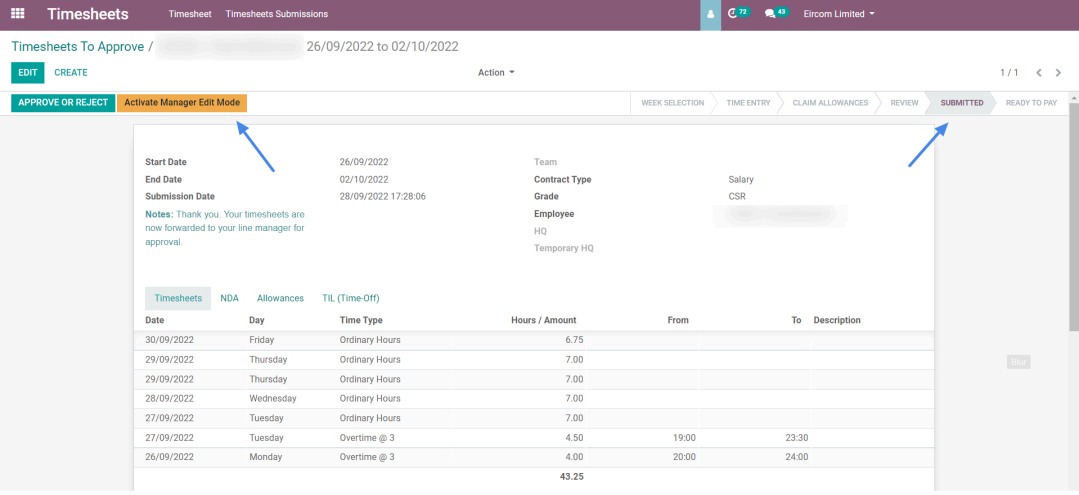
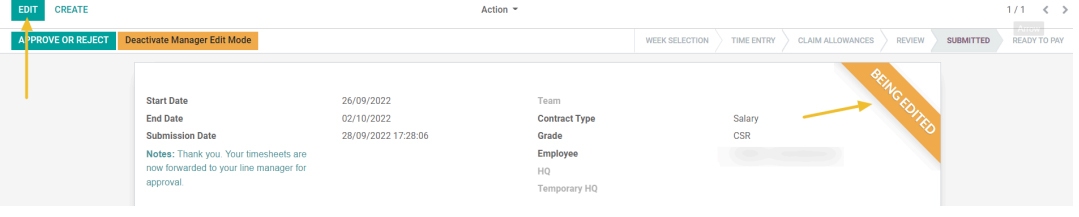
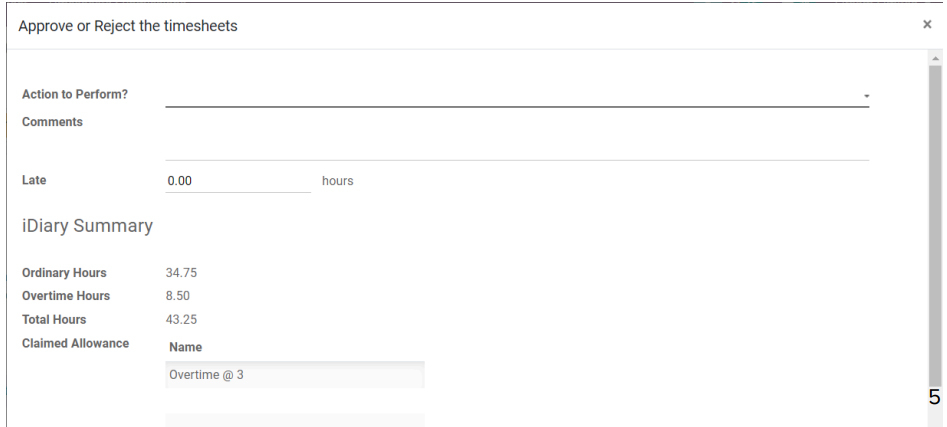
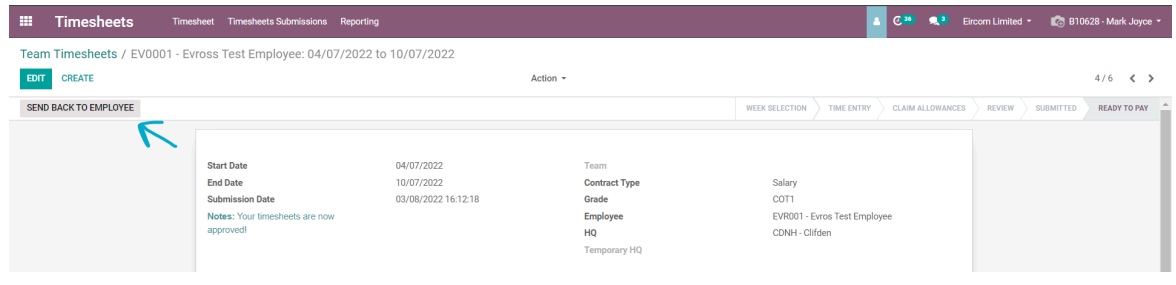
The Team Timesheets feature offers a centralised platform within the employee app for efficient time tracking and workforce management. Accessible to team members and managers, it provides real-time tracking of hours worked, leave taken, and overtime, with customisable views for easy analysis. Features include detailed time entries, streamlined approval workflows, automatic notifications, and historical data analysis. Benefits include efficient time tracking, improved accountability, streamlined approval processes, and data-driven decision-making. Use cases include project management, resource planning, and performance evaluation. By leveraging Team Timesheets, organisations can optimise time-tracking processes, enhance productivity, and make informed decisions to drive success.

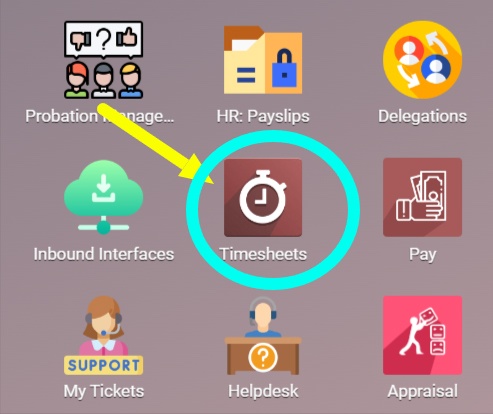
To access this report, navigate to Timesheets > Reporting > Team Timesheets.

Timesheets Measures

Overtime Analysis


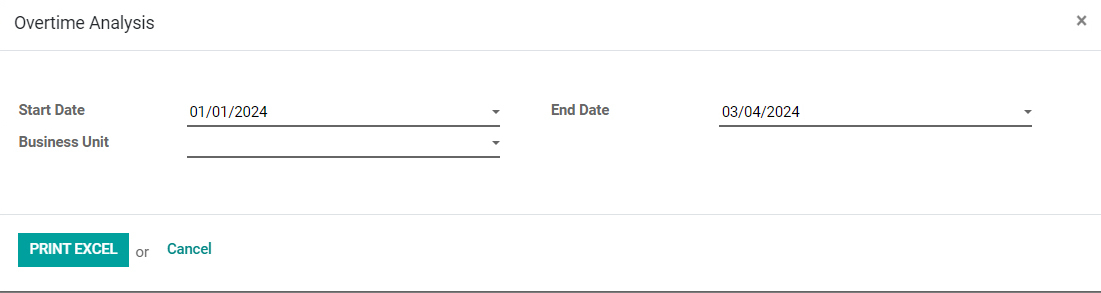
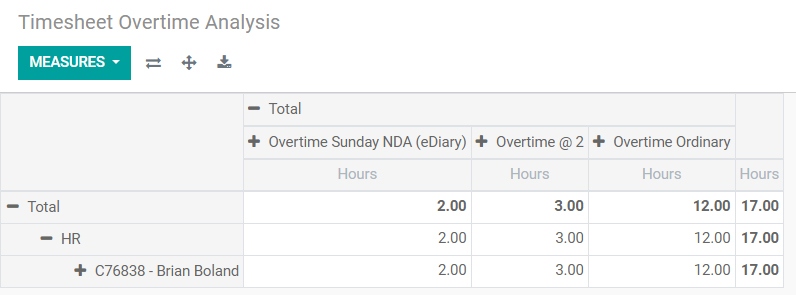
The Overtime Analysis report offers a comprehensive examination of overtime usage across the organisation, aiming to uncover trends and patterns in overtime hours worked. It delves into factors influencing overtime, such as project deadlines, staffing levels, and seasonal fluctuations. By analysing the frequency, duration, and distribution of overtime hours among employees and departments, the report enables organisations to optimise workforce management strategies and address potential issues related to excessive or unauthorised overtime. Benefits include improved productivity, compliance with labour regulations, and enhanced employee well-being. Use cases range from HR departments assessing the impact on work-life balance to finance departments monitoring labour costs and budget allocations. Through regular monitoring and analysis of overtime use, organisations can make informed decisions to promote a healthy work environment and ensure operational efficiency.

To access the report, navigate to Timesheets > Reporting > Overtime Analysis.
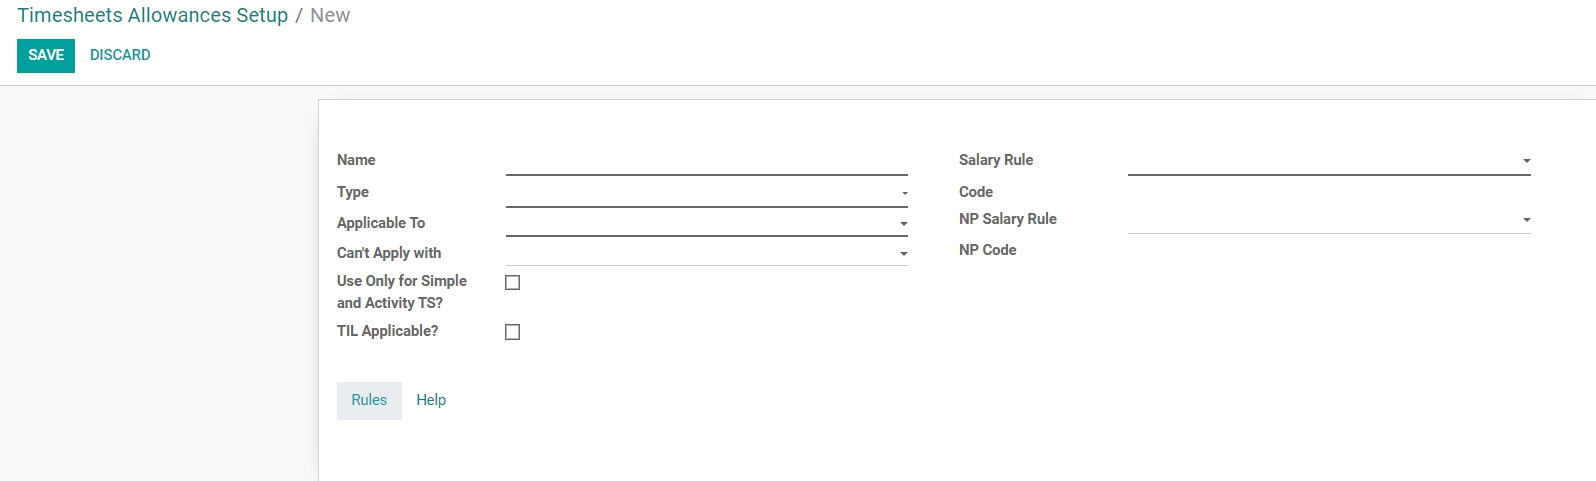
Overtime Analysis 

Allowances Summary


The Allowances Summary report offers a comprehensive analysis of allowances disbursed to employees within the organisation. It provides insights into the types of allowances granted, such as travel, housing, and meal allowances, along with their distribution among employees across different categories, departments, or locations. By examining allowance allocation patterns and utilisation, the report enables organisations to assess the effectiveness of their allowance programs in supporting recruitment, retention, and employee satisfaction. Benefits include improved transparency and accountability in compensation practices, better alignment of allowances with employee needs and organisational objectives, and enhanced compliance with regulatory requirements. Use cases range from HR departments monitoring allowance expenditure to finance departments ensuring accuracy in financial reporting. Through regular review and analysis of the Allowances Summary report, organisations can optimise their allowance practices to attract, retain, and motivate talent effectively while driving organisational success.

To access the report, navigate to Timesheets > Reporting > Allowances Summary.


Search and Save as Favourites


Our system allows you to apply filters and grouping to your data, enabling you to gain valuable insights. You can save these filters as favourites for quick future access or share them with others.

  • To create filters, navigate to any screen and locate the search bar. Enable the filters by clicking the magnifying glass icon.

Accessing filters option using magnifying glass icon 

  • Next, open the filter and click "Add Custom Filter". Select the field you wish to filter, choose the appropriate operator, enter the desired value, and click "Apply". You can add multiple filters by clicking on "Add a Condition" and repeating the process.

Applying custom filters

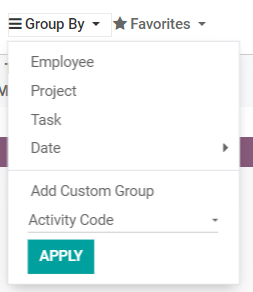
  • Similarly, you can group the data by specific fields by selecting "Group By" and choosing the desired field(s) to group by. You can select multiple fields for grouping.

Grouping your data

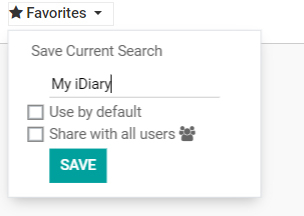
  • Once you have created a useful filter, you can save it to avoid repeating the same work. When saving, you can also choose whether to make the filter available to others or to use it as your default setting.

Saving filters as favourites

Configuration

In this section, we'll illustrate how configurations can be easily updated to match the changing requirements of the organisation.

Appropriation Codes​


  • First, navigate to the “Timesheets App” and go under “Configuration”.
  • From there, select Appropriation Codes to create a new appropriation code.
  • Here, you can input details such as the name, project, description 1, notes, Expense type, and other relevant information.
  • Once entered, “Save” the changes to update the appropriation codes configuration.

Showing details related to appropriation codes 

Timesheets Time Codes


  • In the Timesheets app. First, navigate to “Configuration”, followed by the Timesheets Time Codes.
  • There, you will create a “Time Code” by entering details such as“ Time Code”, “Description”, and “Work Orders”.
  • “Save” the changes, once entered.

Showing details related to Time Codes 

Timesheet Activity Codes


  • First, navigate to the “Configuration, in the “Timesheets App”.
  • Then, we'll go to the Timesheet Activity Codes.
  • Enter the name, and “Save” it.

Showing Timesheet Activity 

Timesheet HQs


  • Begin by accessing the “Timesheets App”, then move to the “Configurations” tab.
  • From there, navigate to the Timesheet HQs section.
  • Then click on the “Create” option, where you'll be prompted to fill in details such as “code”, and “ name”.
  • And “Save” the changes.

Showing details related to Timsheet HQs 

Timesheet Customer


  • First, navigate to the “Configuration, in the “Timesheets App”.
  • Then, we'll go to the Timesheet Customer.
  • Enter the name, and “Save” it.

Showing Timesheet Customer Configuration 

Customer Tickets


  • Start by accessing the “Timesheets App”, then proceed to “Configurations”.
  • Within “Configurations”, locate and select Customer Tickets.
  • Then click the “Create” option. Here, you'll fill in the necessary details about the Customer Tickets.
  • “Save” the changes.


FAQs

To change the timesheet type in the timesheets app, access the settings, select the desired timesheet type, and save the changes. Adjust time entry accordingly based on the new schedule or format.

You can view your timesheet history and track your accumulated hours by accessing the appropriate section of the timesheets app. This typically includes features for viewing past time entries, tracking total hours worked, and monitoring accrued leave balances.

Glossary

Term Description
HQ Headquarter
OT Rule Overtime Rule
Activity TS Technical Support
NP SalaryRule Non-Pensionable Salary Rule
NDA Night Duty Allowance

Version History

1.0

Prepared By

Palwasha Azher

Date Updated

17/04/2024