What is Landed Cost?
by Bilal Akmal
Landed cost, in essence, embodies the comprehensive expense a purchaser must bear upon acquiring a product. It extends beyond the mere sticker price, encompassing a medley of elements such as transportation, customs duties, handling fees, service charges, and various other incidental costs intrinsic to the procurement process. When determining the selling price of a product, these supplementary expenditures are amalgamated with the actual cost of the item.
Within the realms of Odoo's capabilities, the landed cost feature stands as a powerful tool, enabling users to seamlessly integrate a spectrum of supplementary expenses – encompassing shipment, insurance, customs duties, and more – directly into the overall cost structure of a product. This functionality not only enhances the precision of cost calculations but also affords a holistic perspective, ensuring that all pertinent expenditures associated with bringing a product to market are duly accounted for. In essence, Odoo's landed cost feature is a strategic asset, facilitating a more comprehensive and accurate representation of the true financial investment tied to each product.
Configuration
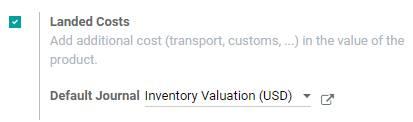
Initiate the configuration process by navigating to the Inventory module, precisely through the path of Inventory ‣ Configuration ‣ Settings ‣ Valuation. Within this interface, engage the Landed Costs feature to unlock its functionality. Odoo, in its user-centric design, extends the flexibility to designate a Default Journal. This setting empowers users to specify the journal in which the meticulous accounting entries of landed costs will be meticulously recorded. This not only streamlines the process but also allows for a tailored approach to financial tracking, aligning seamlessly with the nuanced requirements of the business.
Add Costs to Products
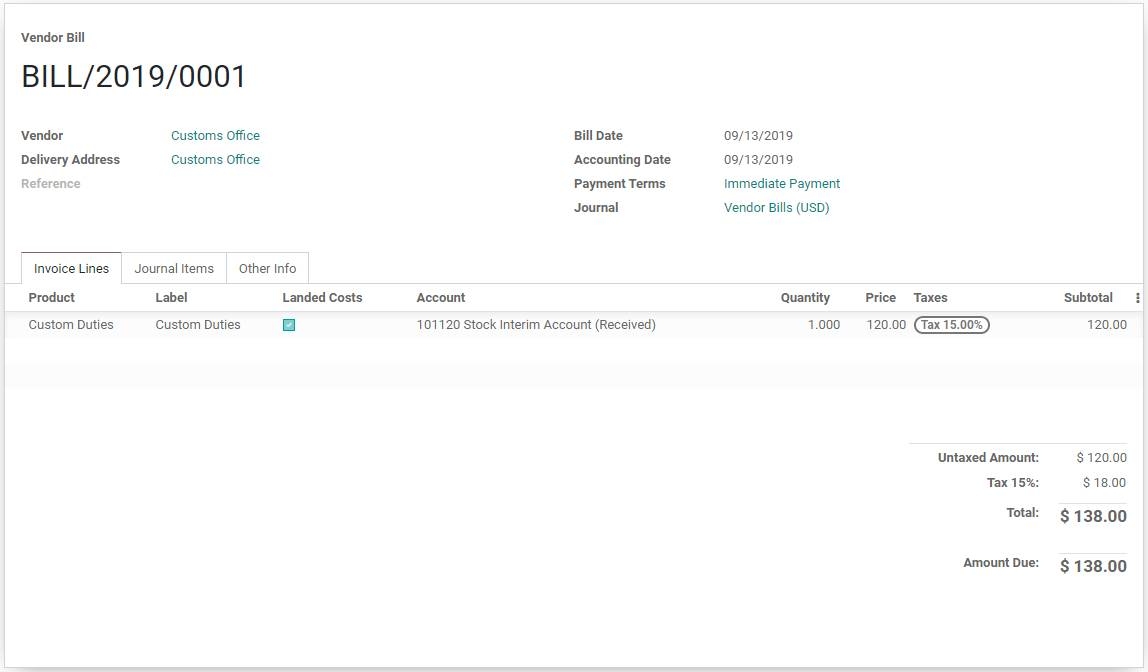
Once your vendor completes a purchase order and sends over the bill, go ahead and click on "Create Bill" directly from the purchase order in Odoo. If that bill involves additional costs, like custom duties or other landed costs, it's as easy as ticking the box in the "Landed Costs" column on the specific line of the vendor bill. This way, you ensure that all those extra expenses are properly considered and accounted for in your records.
Simplify the process of handling consistent landed costs by establishing a dedicated landed cost product in Odoo. This allows for the swift inclusion of the landed cost product in vendor bills as an invoice line, eliminating the need for repetitive manual entries with every incoming bill.
Here's a step-by-step guide:
- Start by creating a new product in Inventory ‣ Products ‣ Products ‣ Create.
- Give your product a name, specifically designating it as the landed cost product.
- Set the Product Type to Service, as a landed cost product must always fall under the service category.
- Navigate to the Purchase tab and tick the box labeled Is a Landed Cost.
- Save your changes to finalise the creation of the landed cost product.
Moreover, if this product consistently serves as a landed cost, you can save time by defining it directly on the product itself, avoiding the need to tick the box for each vendor bill. This efficient approach ensures a seamless and automated integration of landed costs into your vendor billing process.
After incorporating the landed cost into the vendor bill, whether by selecting the Landed Cost option on the invoice line or introducing a landed cost product to the bill, proceed by clicking the "Create Landed Costs" button located at the bill's top in Odoo. This triggers the automatic generation of a landed cost record, with the designated landed cost already populated in the Additional Costs product lines.
To fine-tune the application of these additional costs, pinpoint the relevant picking by selecting "Edit" and choosing the picking reference number from the Transfers drop-down menu. Once you've aligned the costs with the appropriate picking, seal the deal by clicking "Save." This seamless process in Odoo ensures that your landed costs are accurately recorded and associated with the corresponding pickings, providing a comprehensive and organised overview of additional expenses tied to your inventory transfers.
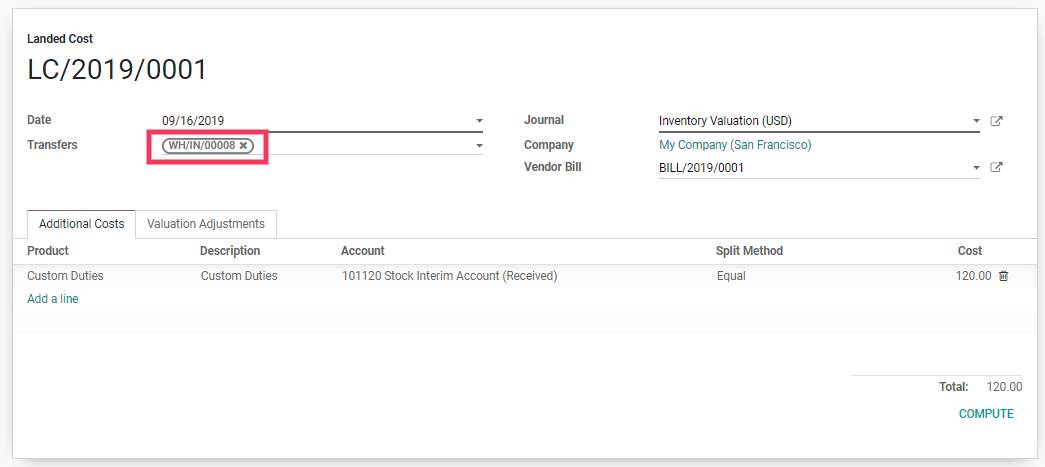
Once you've established the picking, proceed by hitting "Compute" on the landed cost record. Navigate to the Valuation Adjustments tab to inspect the influence of the landed costs on your records. After ensuring everything aligns with your expectations, seal the deal by clicking "Validate" to officially post the landed cost entry to the accounting journal.
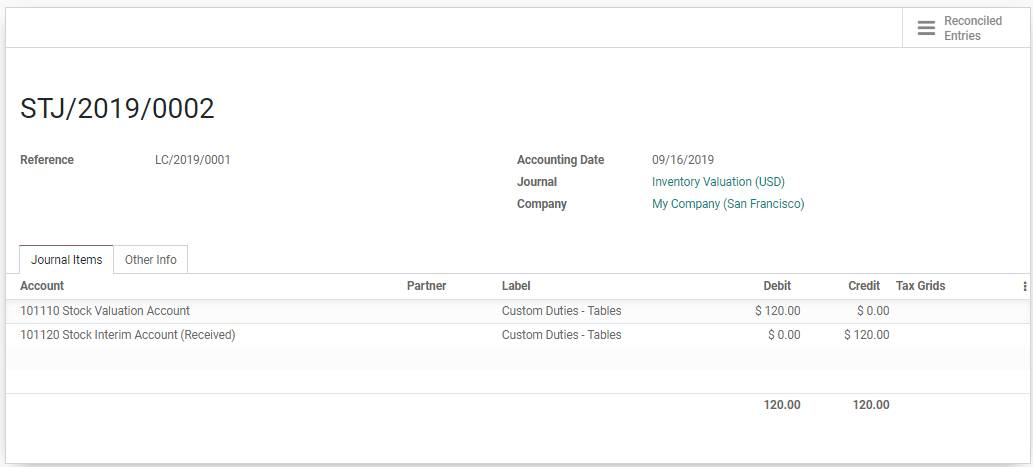
For a closer look at the nitty-gritty details, users can easily access the journal entry generated by the landed cost by simply clicking on the Journal Entry. This feature empowers users with transparency, offering a clear audit trail and insight into the financial implications of the landed costs. It's a user-friendly approach within Odoo to ensure that the impact of landed costs is accurately reflected in your accounting records.
Note: To apply landed costs seamlessly, it's essential to note that the product receiving the cost must be categorised with a product category set to either a FIFO (First In, First Out) or an AVCO (Average Cost, also known as Weighted Average) method.
Direct Access
By navigating to Inventory ‣ Operations ‣ Landed Costs, users can initiate and manage landed cost records independently of vendor bills. This streamlined process enables efficient tracking and adjustment of additional costs associated with inventory, offering a versatile solution tailored to diverse operational scenarios.