Cloud Functions for Firebase
by Ans Ali
Efficiency and scalability are crucial in web and mobile app development. Firebase Cloud Functions is a powerful tool that allows developers to run backend code in response to events triggered by Firebase features and HTTPS requests. With its seamless integration into the Firebase ecosystem, Cloud Functions empower developers to build robust and scalable applications without the hassle of managing servers. In this step-by-step guide, we’ll explore how to create Cloud Functions in Firebase.
Steps to Create Cloud Functions in Firebase
Step 1: Set Up Your Firebase Project
First things first, ensure you have a Firebase project set up. If not, head over to the Firebase Console (console.firebase.google.com), create a new project, and follow the on-screen instructions to set it up. Once your project is created, you’ll need to install the Firebase CLI (Command Line Interface) if you haven’t already. This allows you to interact with your Firebase project from the command line.
Step 2: Initialise Cloud Functions
Once your Firebase project is set up and the Firebase CLI is installed, navigate to your project directory in the terminal and initialise Cloud Functions by running the following command:

This command will prompt you to select the Firebase project you want to associate with the Cloud Functions. Follow the on-screen instructions to complete the initialisation process.
Step 3: Write Your Cloud Function
After initialization, you’ll find a `functions` directory in your project containing a file named `index.js`. This is where you’ll write your Cloud Functions code. Let’s create a simple example function that triggers when a new user signs up:
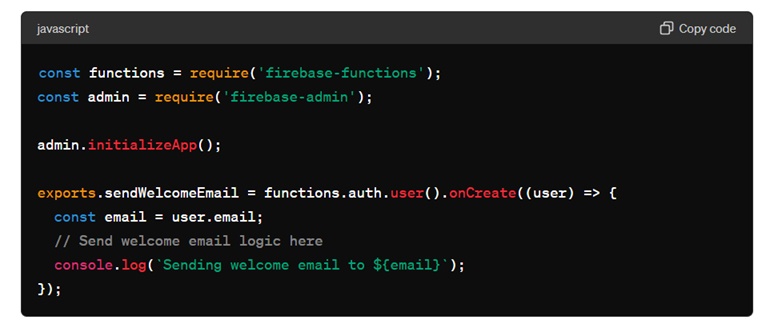
In this example, we use the `auth.user().onCreate` trigger to execute the function when a new user signs up. You can replace the placeholder code with your desired functionality, such as sending a welcome email, updating a database, or triggering other Firebase services.
Step 4: Deploy Your Cloud Function
Once you’ve written your Cloud Function, it’s time to deploy it to Firebase. Navigate to your project directory in the terminal and run the following command:

This command deploys only the Cloud Functions in your project. If this is your first time deploying functions, Firebase will provision the necessary resources, including a Cloud Functions runtime environment.
Step 5: Test Your Cloud Function
After deployment, your Cloud Function is live and ready to be tested. You can trigger the function by performing the action that it’s designed to respond to. For our example function, signing up a new user will trigger the `sendWelcomeEmail` function.
Conclusion
Firebase Cloud Functions offer a convenient and scalable solution for executing backend code in response to events triggered by Firebase services or HTTPS requests. By following this step-by-step guide, you can create and deploy Cloud Functions in your Firebase project, unlocking endless possibilities for building powerful and efficient applications.
Need more development tips?
Stay tuned to our blog.